DHCC CMS User Guide
Everything you need to manage pages, posts, media and settings on the DHCC website — written for the people who use the CMS every day, not for developers.
Introduction#
The DHCC CMS is the content platform behind the DHCC website. It has two halves. The first is the Admin Control Panel, or ACP, which lives at /acp — this is where you and the rest of the content team sign in to manage pages, blog posts, media, navigation menus and site-wide settings. The second half is the public website itself, the fast, server-rendered site that visitors see, available in both English and Arabic.
You don't need to know anything about code to use the ACP. Pages and posts are built from simple, reusable content blocks, and every screen is designed to be self-explanatory — this guide walks through each one in the order you're likely to need it.
One more thing worth knowing up front: AI assistants such as Claude or Cursor can also operate the CMS on your behalf, through a secure connector described later in this guide. Every change an AI assistant makes arrives as a draft, never goes live on its own, and is fully recorded in the Activity log — the same as anything a person does.
| What you need | Details |
|---|---|
| A user account | Created for you by an administrator, with a role that determines what you can see and do. |
| A modern browser | Chrome, Safari, Firefox or Edge, kept reasonably up to date. |
| Software to install | None. The ACP runs entirely in your browser. |
Signing In#
Go to /acp in your browser. If you aren't already signed in, you'll be redirected straight to the sign-in screen, where you enter your email address and password.
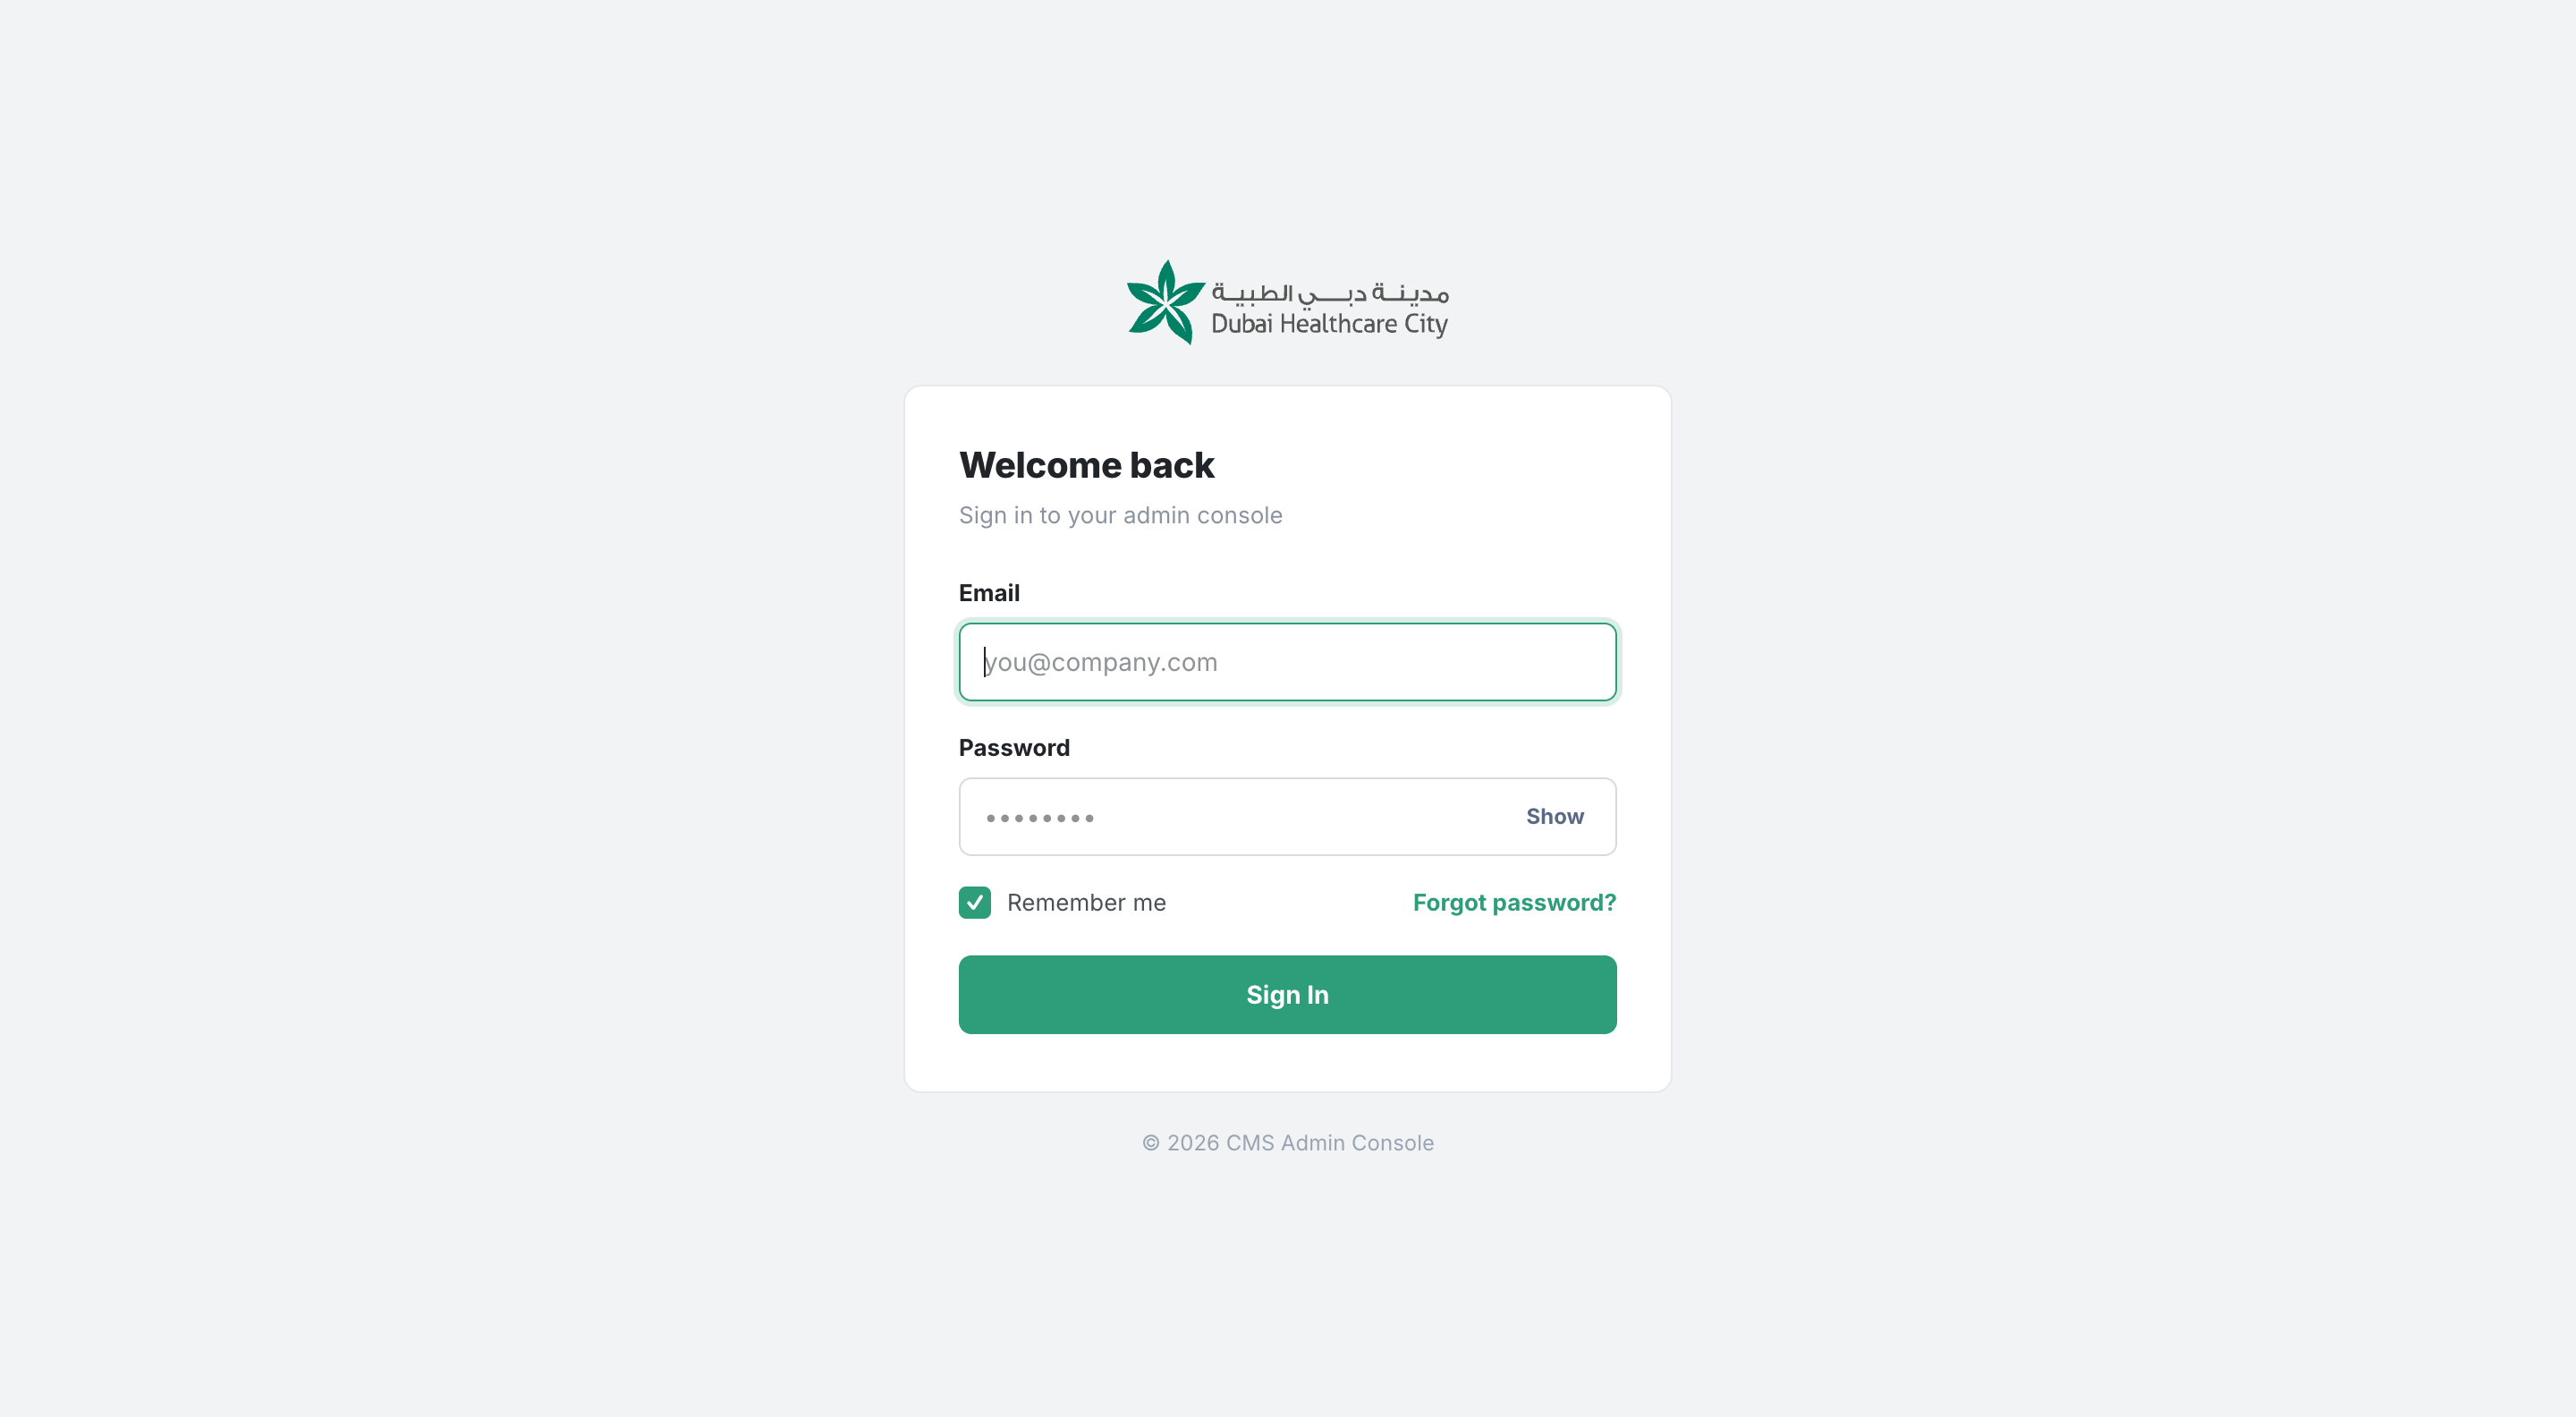
Tick Remember me if you're on a device only you use — it keeps you signed in for 30 days. Otherwise, your session lasts 12 hours before you need to sign in again. If you've forgotten your password, use the Forgot password link to receive a reset email; the link inside it is signed and expires after a short window, so request a fresh one if it's gone stale.
Note: After five failed sign-in attempts for the same email address or from the same network, sign-in is temporarily throttled. If this happens, wait a minute and try again rather than repeatedly retrying.
A handful of sensitive actions elsewhere in the ACP — changing your email address, for instance — will ask you to re-confirm your password before they proceed, even though you're already signed in. This is expected and simply protects your account if you've stepped away from your desk.
The Dashboard#
The dashboard is the first thing you see after signing in, and it gives you a quick sense of what's happening across the site.
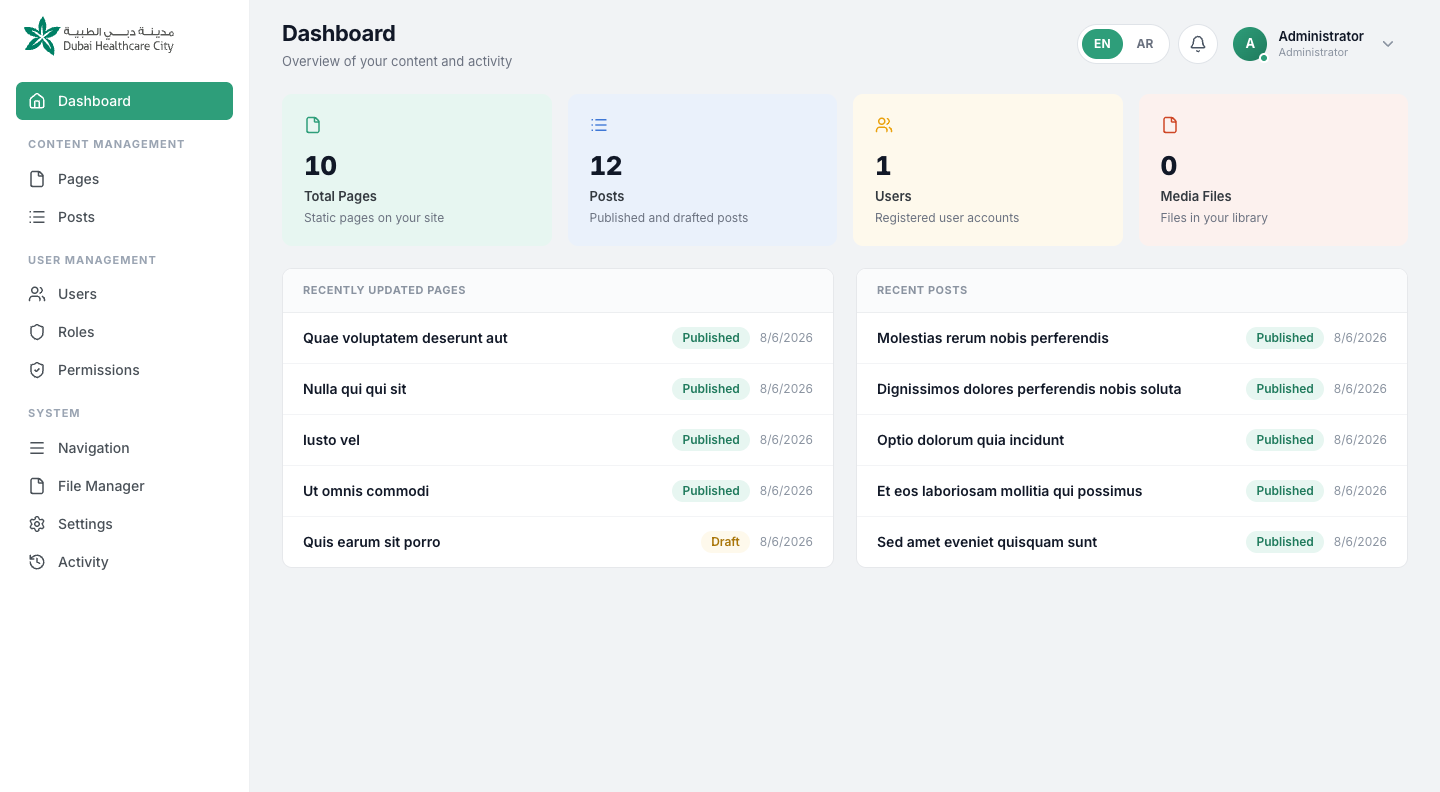
Four stat cards sit across the top — Pages, Posts, Users and Media Files — each showing a running count and linking straight through to that module. Below them, you'll find a list of recently updated pages and a list of recent posts, each with a status pill so you can see at a glance what's live, drafted, scheduled or archived.
The dashboard, like the rest of the sidebar, is aware of your permissions. You'll only ever see the modules you're allowed to use. If your account has no permissions assigned yet, you'll see a friendly welcome screen instead of an empty dashboard — reach out to an administrator to get set up.
Pages#
Pages are the static content of the site — things like "About Us," "Contact," or the homepage itself. The Pages screen lists every one of them.
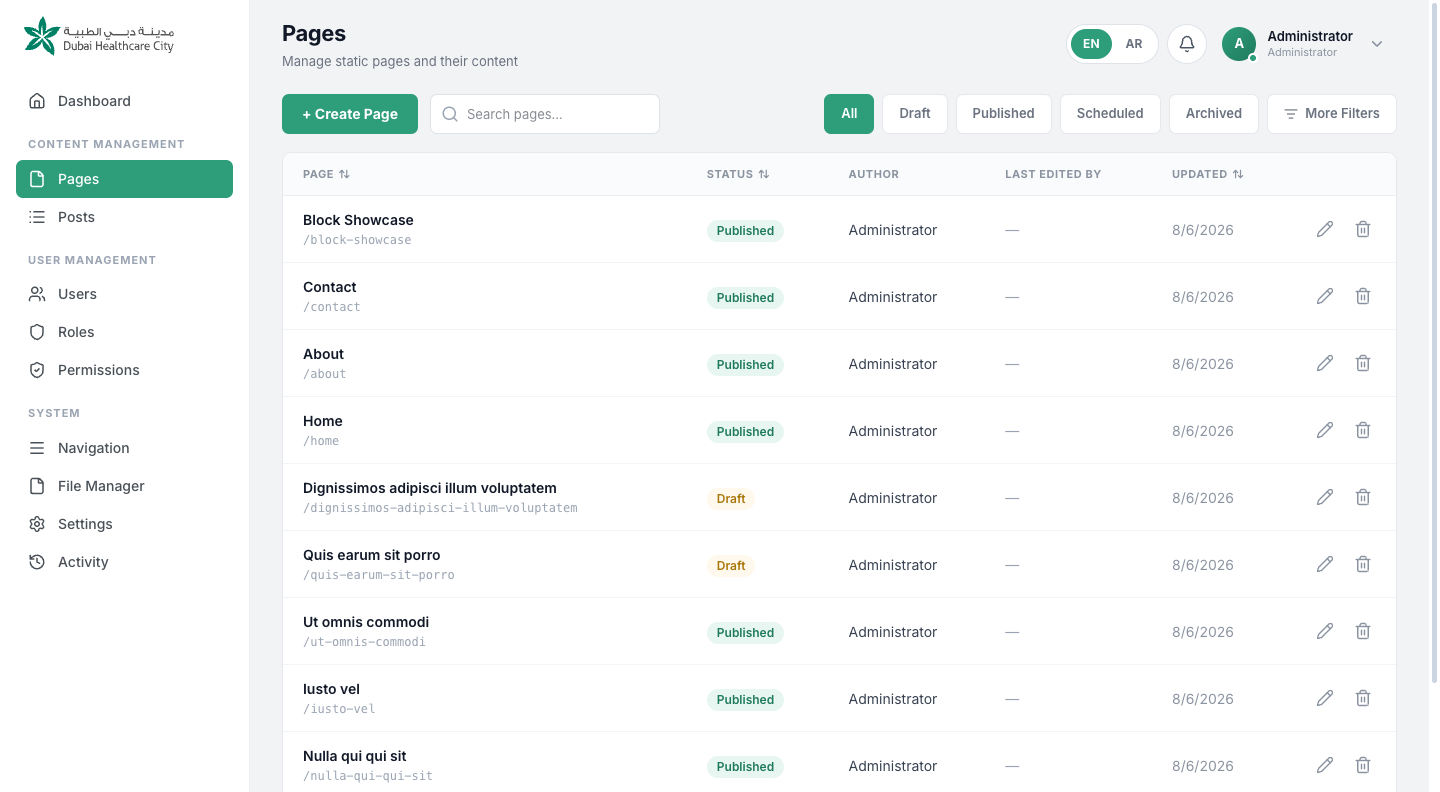
You can search by title, or narrow the list using the status chips along the top — All, Draft, Published, Scheduled and Archived. Click More Filters to filter by author as well. Most columns are sortable, and long lists are paginated so the screen stays quick to scan. Each row shows the page's title and slug, its status, its author, who last edited it and when, along with Edit and Delete actions.
Creating your first page#
- Click Create Page.
- Type a title — a URL-friendly slug is generated for you automatically as you type.
- Pick a template for the page.
- Add and arrange your content blocks.
- Set the page's status.
- Click Save.
Two templates are available out of the box. Default gives you a free-form canvas built entirely from content blocks, described in the next section. Home is the DHCC homepage template, with guided sections for a hero, business-setup cards, spotlight sections, a news grid and partner logos.
Note: Additional templates can be added by developers through configuration, without any database changes — so don't be surprised if the list of templates grows over time.
The Block Editor#
Pages using the Default template are assembled from a stack of content blocks. Each block is a self-contained piece of content — a paragraph of text, an image gallery, a call-to-action banner — and you can add, reorder and remove them freely to build the page you need.
| Block | What it's for |
|---|---|
| Rich Text | Formatted text with headings, lists and links. |
| Accordion | Collapsible sections — great for FAQs. |
| Tabs | Content split across switchable panels. |
| Image Gallery | A grid of images with captions. |
| Image Slider | A rotating carousel of images. |
| Video Embed | A video from a URL, or a file uploaded through the File Manager. |
| Call to Action | A heading paired with a button. |
| Testimonials | Quotes with attribution. |
Every block has its own set of friendly, validated fields — you won't be able to save malformed content by accident. Use the ↑ and ↓ controls to move a block up or down the page, and Remove to delete one entirely. To add a new block, click Add Block, which opens a searchable gallery with a short description of what each block does.
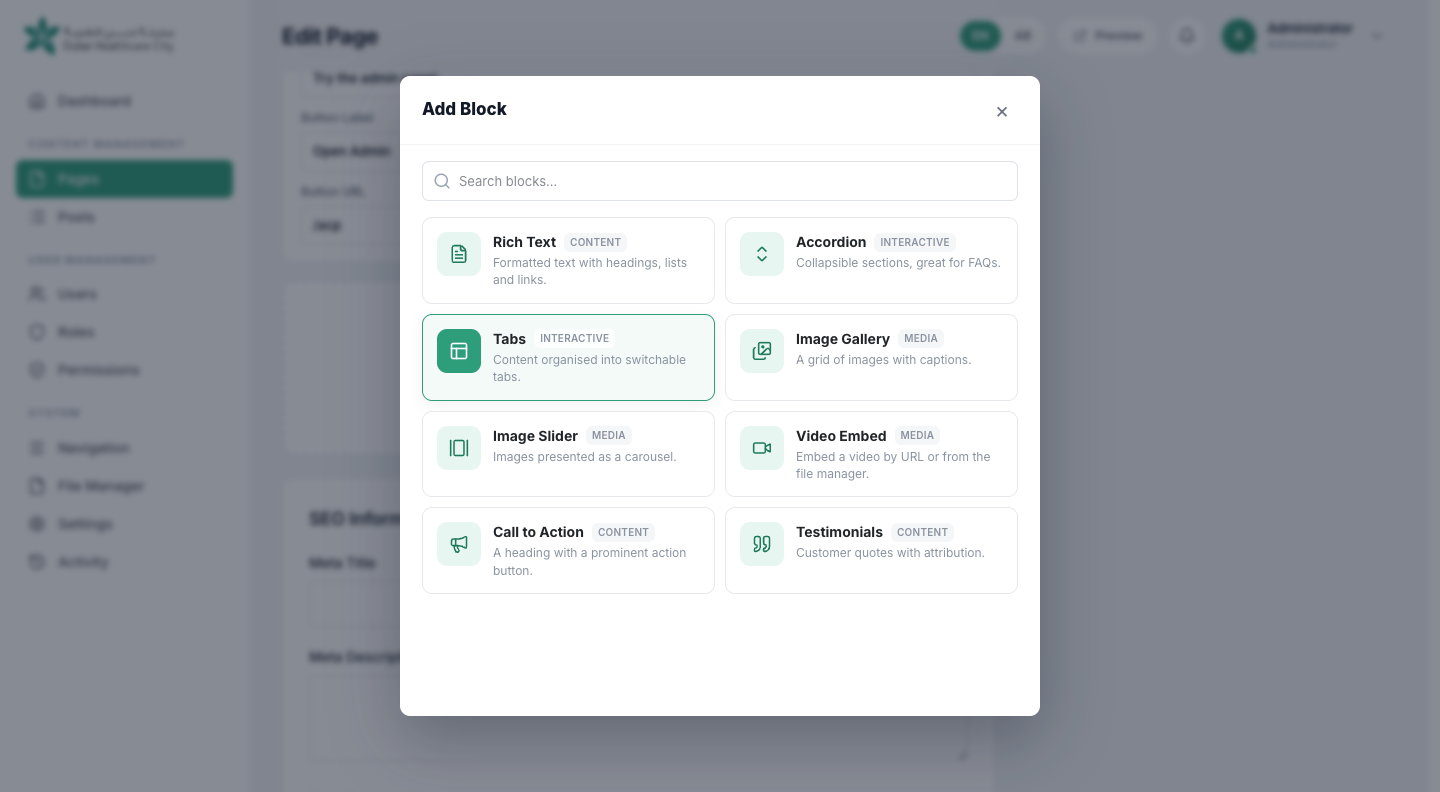
Some blocks — Accordion, Tabs and Testimonials among them — contain repeatable sub-items. You can add, reorder and remove these individually, the same way you manage blocks on the page itself: an accordion might have three sections today and five next week, without touching anything else on the page.
Beyond the block stack, every page also has a Description field, an SEO panel (covered in its own section below), and a Status control that governs whether the page is live. A Preview link in the editor header opens the page exactly as it will appear on the live site.
Posts#
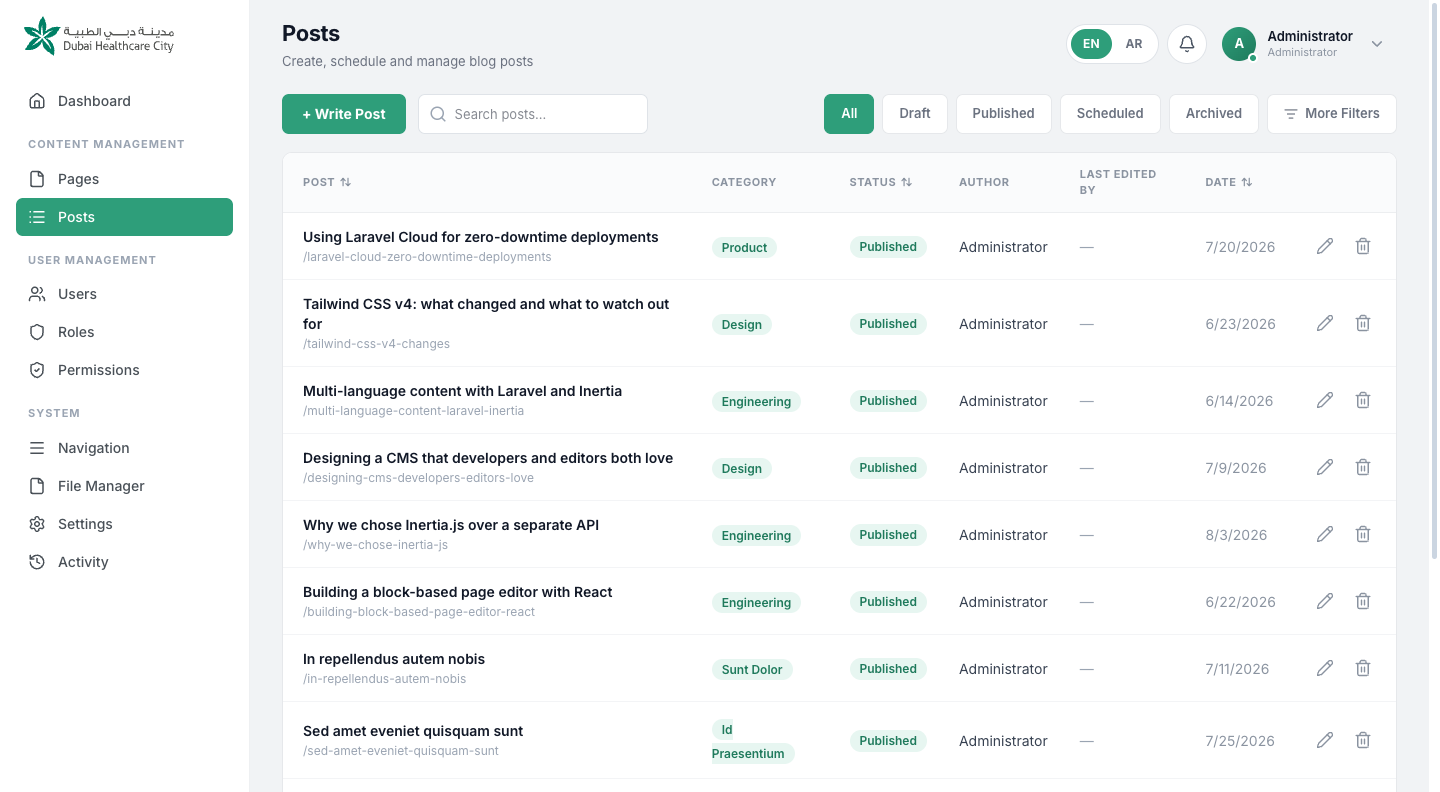
Posts are the articles that make up the news and blog section of the site. The Posts index works the same way as Pages, with one addition: a Category column, and a matching filter, so you can see articles grouped by topic.
Opening a post for editing gives you a title, a slug, a category picker — you can choose an existing category or add a new one inline without ever leaving the page — and a description or excerpt, which is what appears on the blog index.
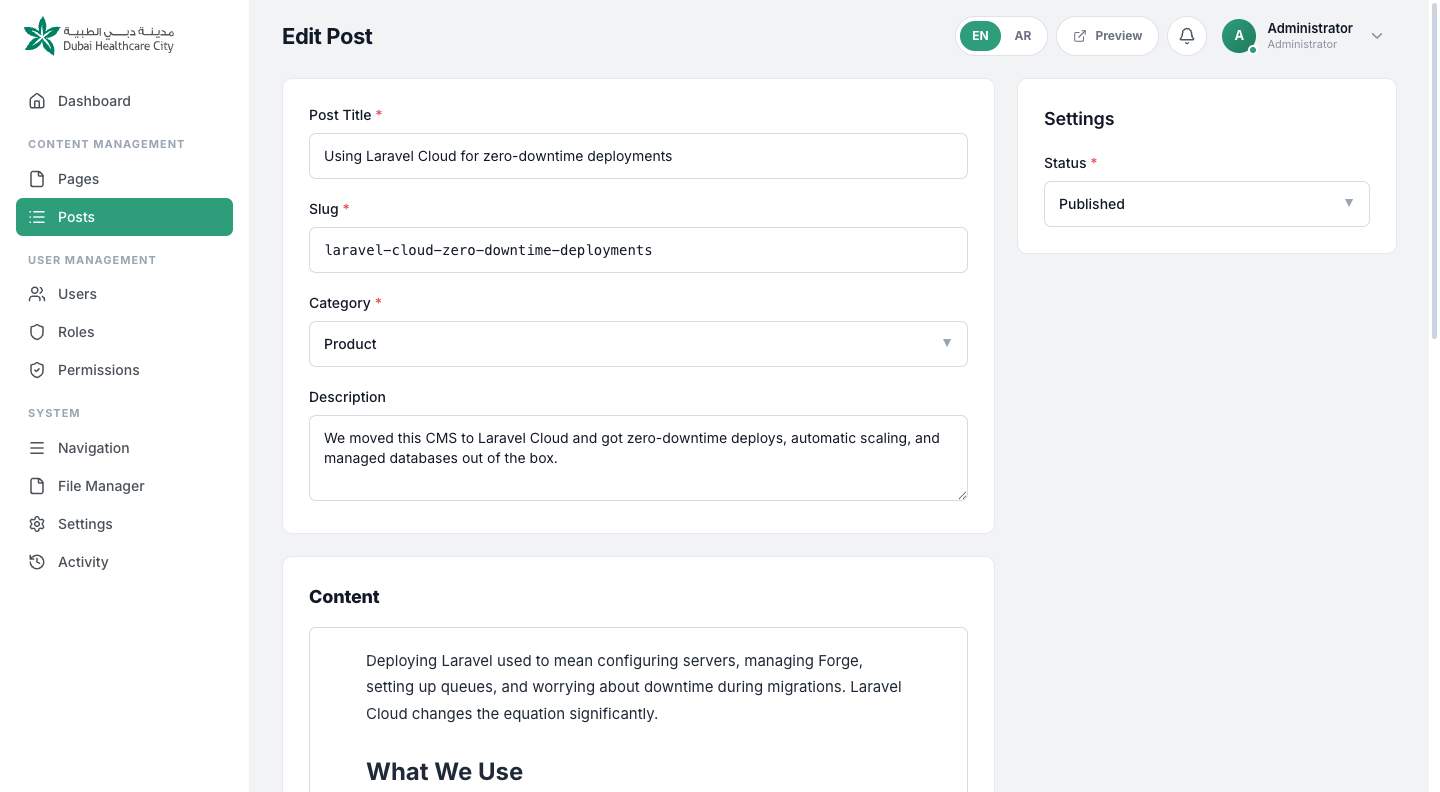
The body of a post is written in a modern rich-text editor. Select any text and a floating toolbar appears with formatting options. Type / on an empty line to open a slash menu that lets you insert images and video directly from the File Manager, without switching screens. Paragraphs and media blocks each have a drag handle, so reordering the article is just a matter of dragging things into place. Behind the scenes, everything is stored as clean HTML.
Posts carry the same SEO panel and status control as pages, and the same Preview link opens the article on the live site exactly as readers will see it.
Publishing & Scheduling#
Every page and post moves through the same four-stage lifecycle, controlled by its Status field.
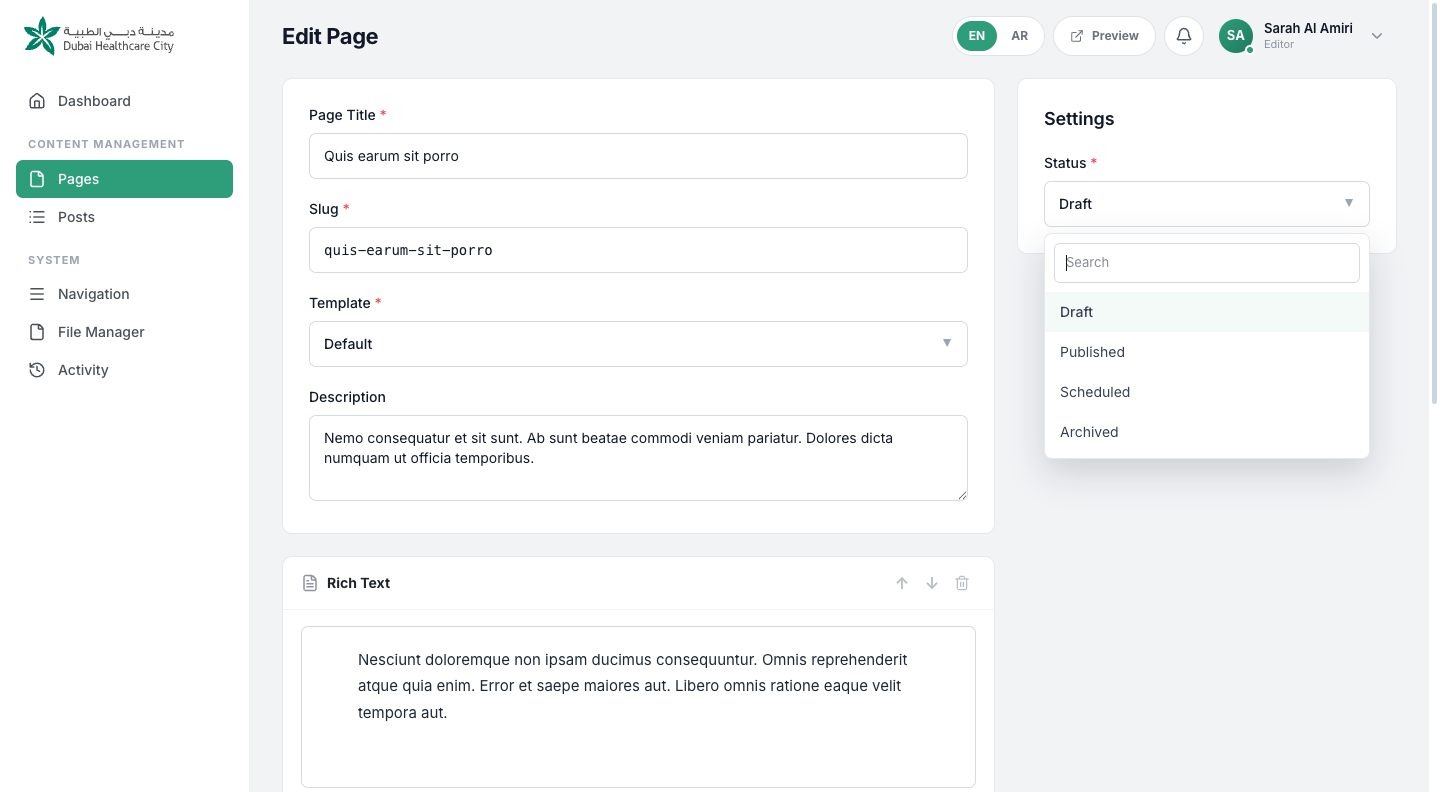
| Status | What it means |
|---|---|
| Draft | Only visible to signed-in editors — never to site visitors. |
| Published | Live on the public site right now. |
| Scheduled | Goes live automatically at a date and time you choose. A scheduler checks for due content every minute. |
| Archived | Removed from the public site, but kept safely in the CMS. |
Choosing Scheduled reveals a date and time field, so you can line content up ahead of an announcement or event without needing to be at your desk when it goes live.
While something is still a draft, you can see exactly how it will look by using the Preview link — signed-in editors can view drafts on the real public site this way, but visitors never can. Once a piece of content is published, the rest of your fellow administrators receive an in-app notification, so the team stays in sync.
Note: Publishing also clears the relevant caches automatically. Your changes reach the live site within seconds — there's no "clear cache" button to press, and none is needed.
SEO#
Every page and post includes a Meta Title, Meta Description and Meta Keywords field. Each one is translatable, so English and Arabic versions of the same content can carry entirely different metadata suited to each audience.
The public site turns these fields into the page's HTML title, its meta description, and its Open Graph tags — the information used when a link is shared and gets a preview card on social media or in messaging apps. Because pages are server-rendered rather than built up in the browser after the fact, search engines see your full content exactly as a visitor would.
Tip: Write your meta description the way you'd write a search-result blurb — around 150 characters, summarising what the page offers rather than restating the title.
File Manager#
The File Manager holds every image, video, audio file and document used across the site, organised however you like.
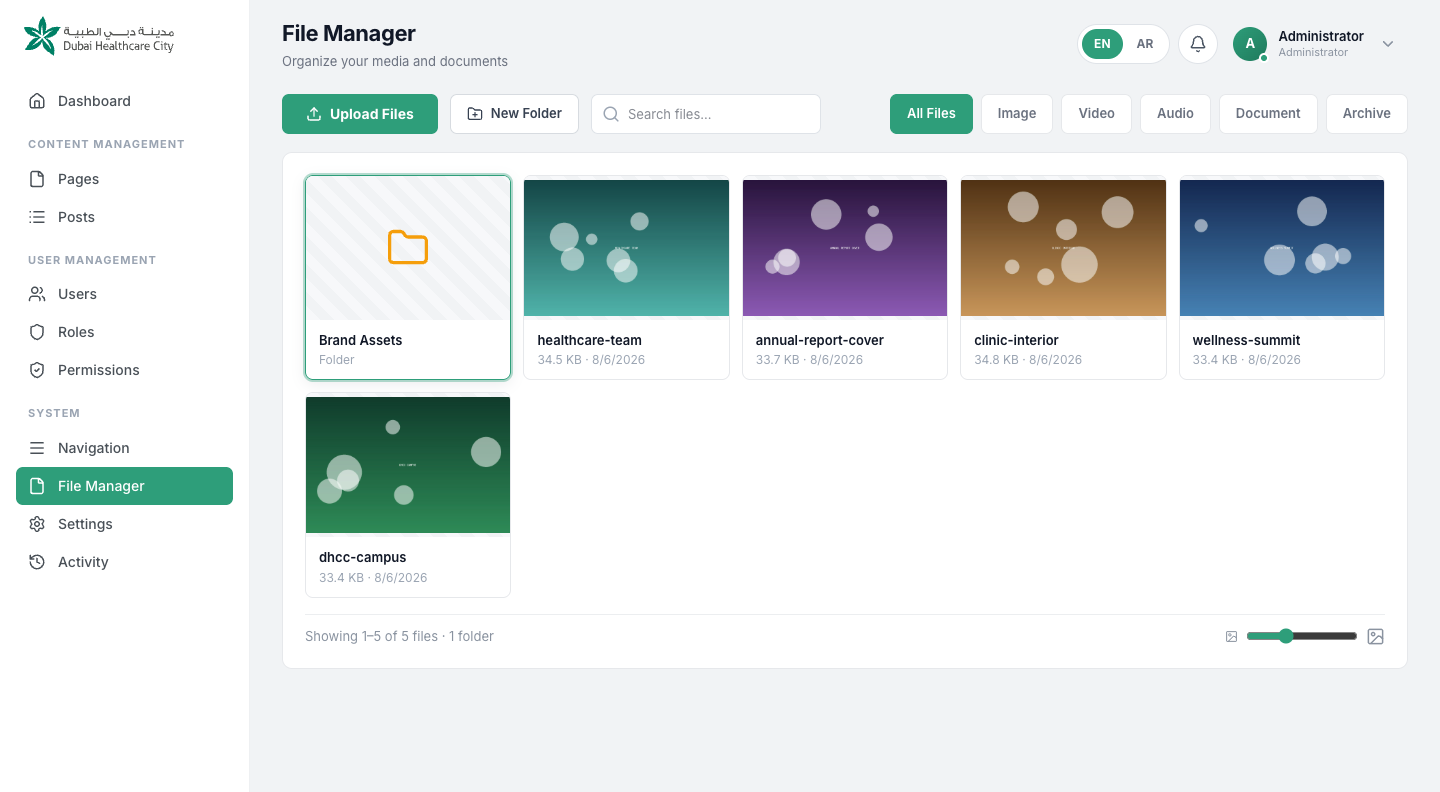
It works much like Finder or File Explorer. Click Upload Files or simply drag files onto the screen, and you'll see a progress bar for each one. Organise files into nested folders, and use the breadcrumbs at the top to move between them. You can rename a file inline, or right-click any item for a context menu with rename, delete and copy-URL actions. Type filter chips — Image, Video, Audio, Document, Archive — narrow the view instantly, and a search box finds files by name. A thumbnail size slider lets you switch between a dense grid and a closer look at each file.
Files you upload are reusable everywhere on the site. Pick them from the block editor's Image, Gallery, Slider or Video blocks, insert them straight from the / menu in the post editor, or simply copy a file's URL to use wherever you need it.
Navigation Menus#
The site has two navigation menus you can manage: Header and Footer. Choose which one you're editing using the Position selector at the top of the screen.
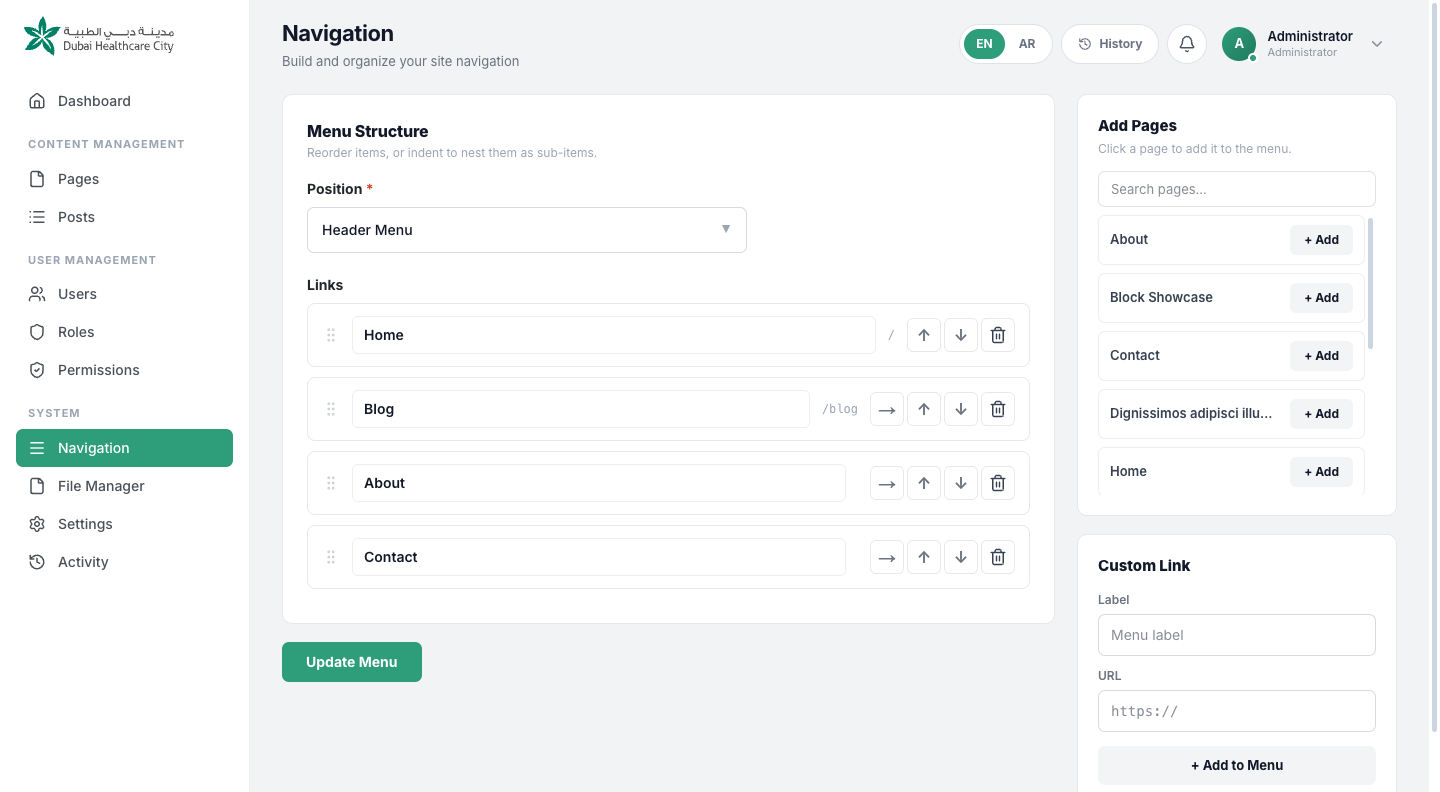
The left-hand panel lets you add items to the menu: search for any existing CMS page, or add a custom link by giving it a label and a URL of your own. The right-hand panel shows the menu tree itself — drag items to reorder them, or indent an item to nest it one level deep under the item above, turning it into a dropdown. Menu labels can be renamed inline, and items can be removed individually. Click Update Menu to save your changes.
Every previous version of a menu is kept automatically. Click History to see earlier versions of the menu and revert to one if you need to undo a change.
English & Arabic#
Nearly everything in the CMS can carry both an English and an Arabic version — pages, posts, categories, menu labels, key settings and SEO fields all support translation.
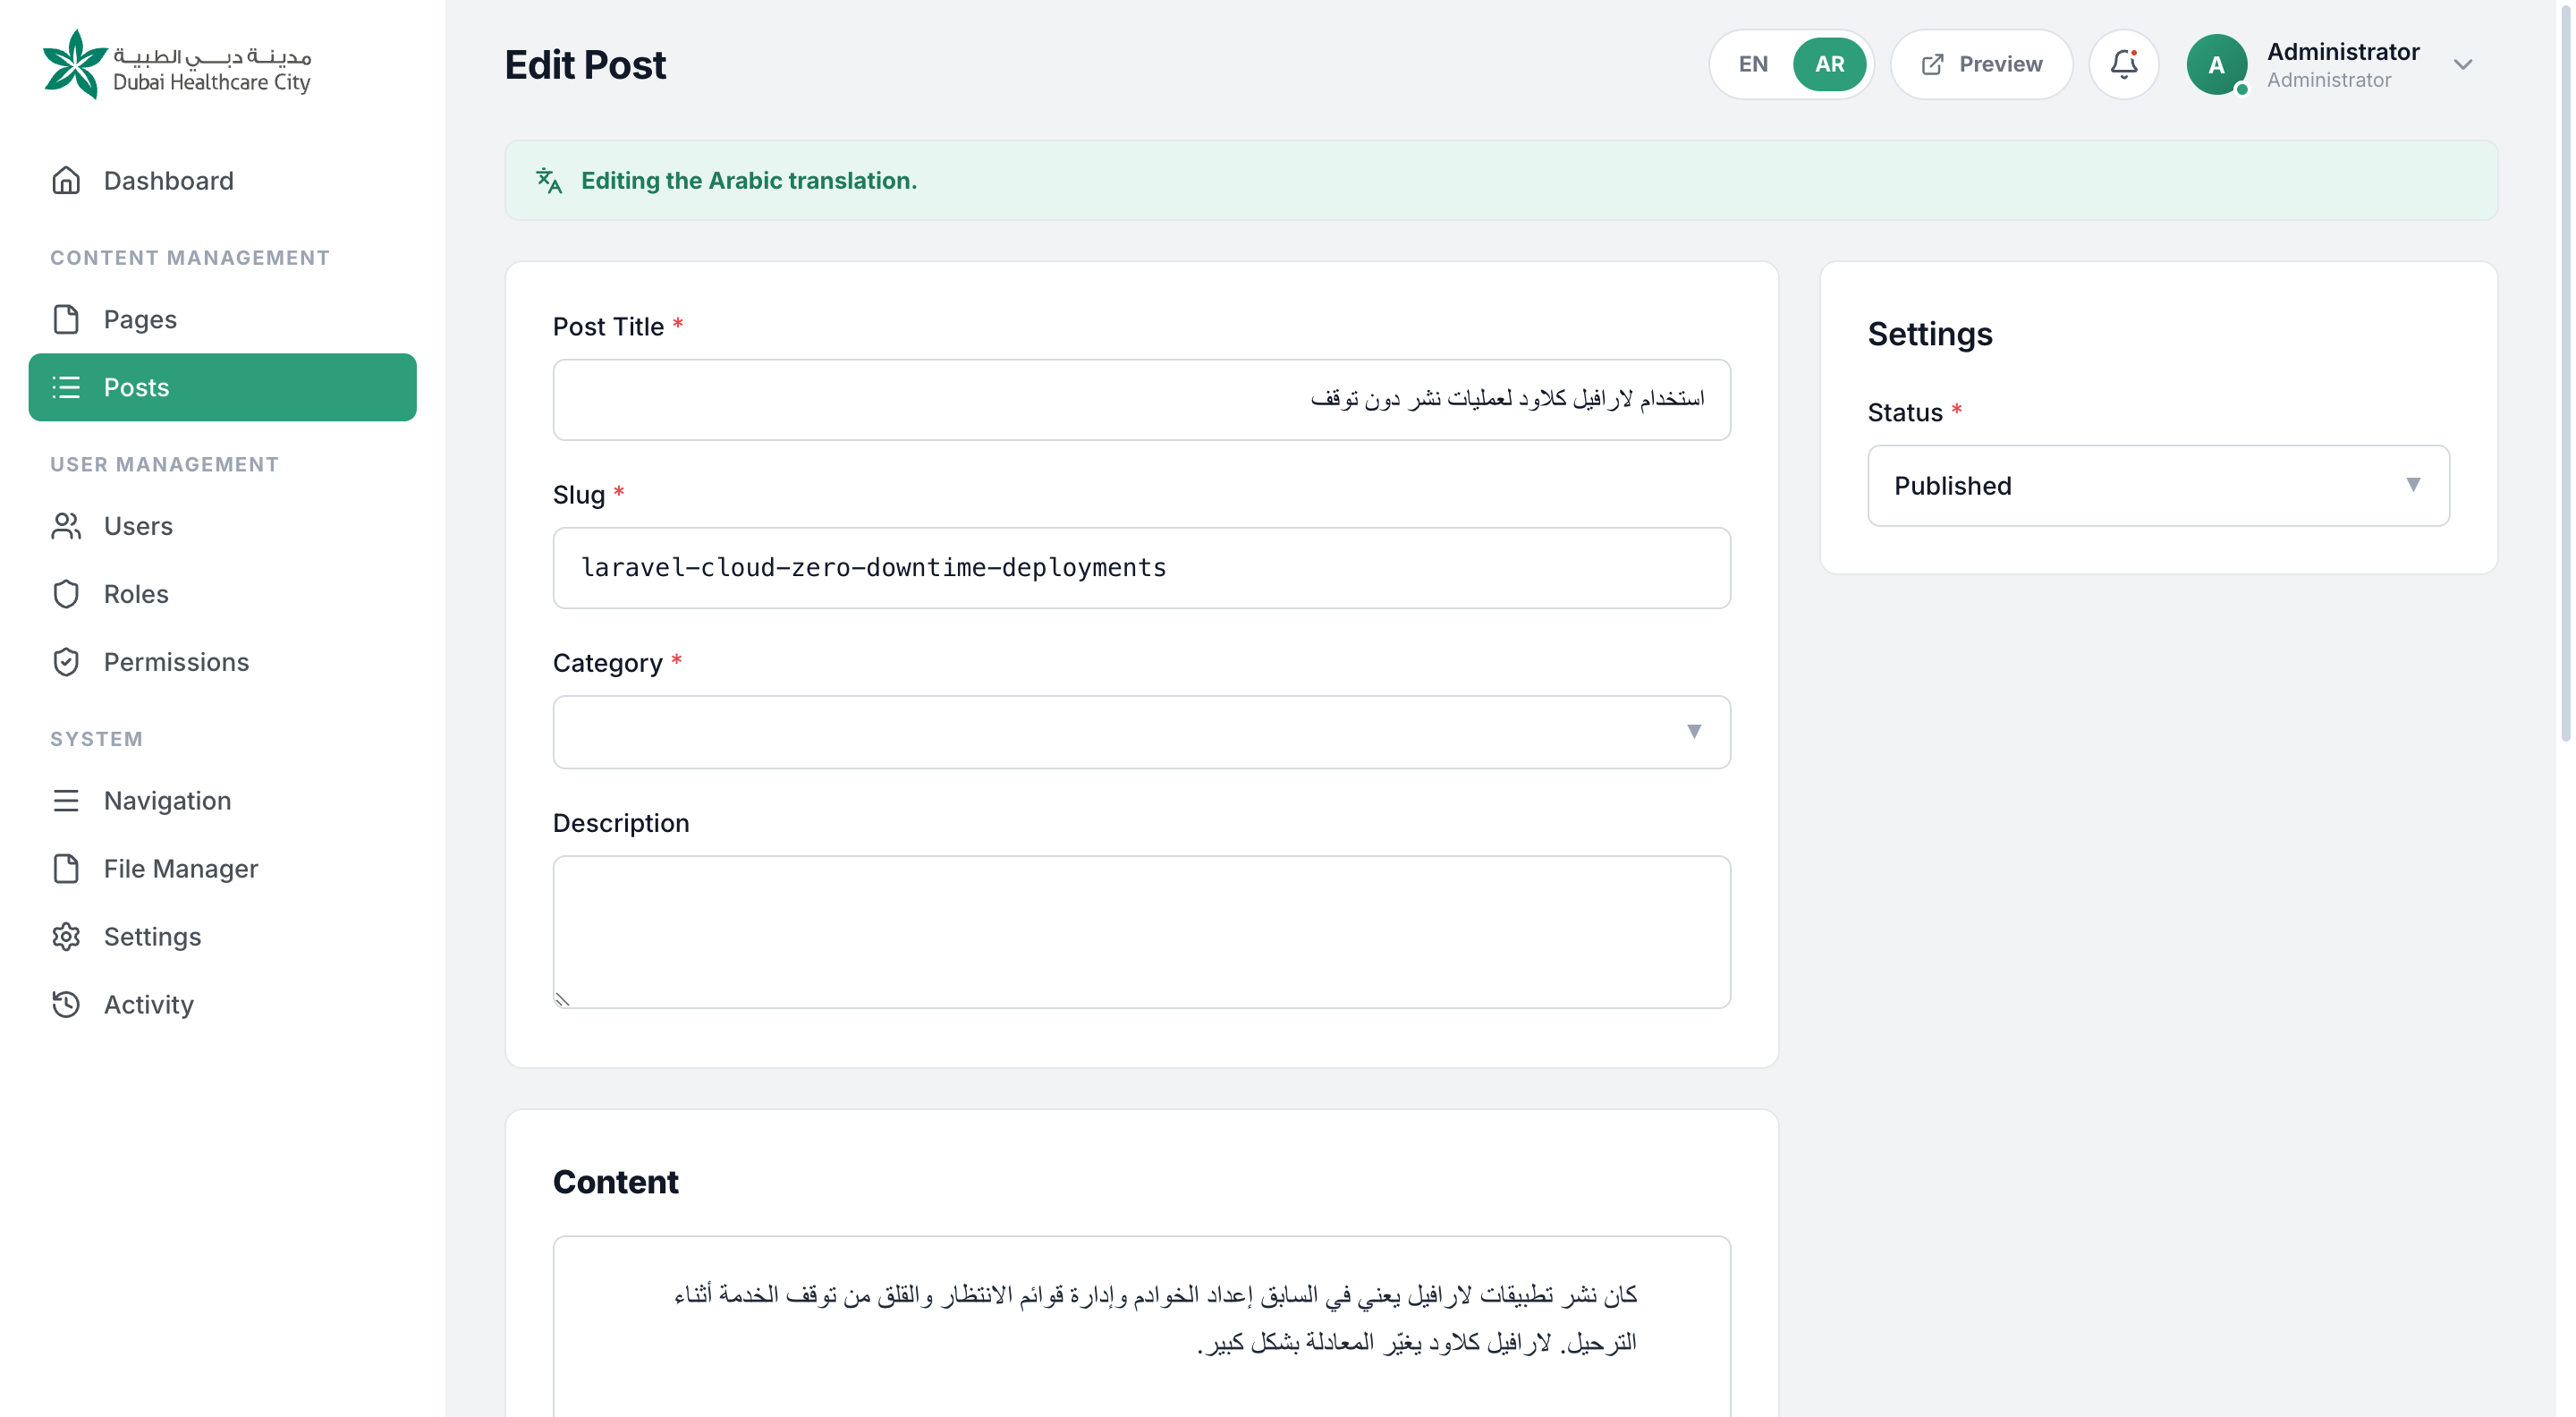
The EN/AR toggle in the ACP header controls your working language — the language you're currently editing. When you switch to Arabic, text fields automatically switch to right-to-left input, so typing feels natural.
As a rule, create content in English first, then switch your working language to Arabic and translate it. This keeps the two versions aligned and avoids drift between them.
Note: As a safety check, the CMS will refuse to save a form if its language no longer matches your current working language — this can happen if you switched languages in another browser tab. If you see this, simply switch back to the matching language and save again.
On the public site, visitors switch languages with the same EN/AR control, and their choice is remembered for a year on return visits. The entire layout flips to a proper right-to-left arrangement in Arabic, not just the text direction. If a particular piece of content hasn't been translated yet, the site quietly falls back to English for it, so nothing ever looks broken or half-finished.
Users#
The Users screen is where you manage everyone who has access to the ACP.
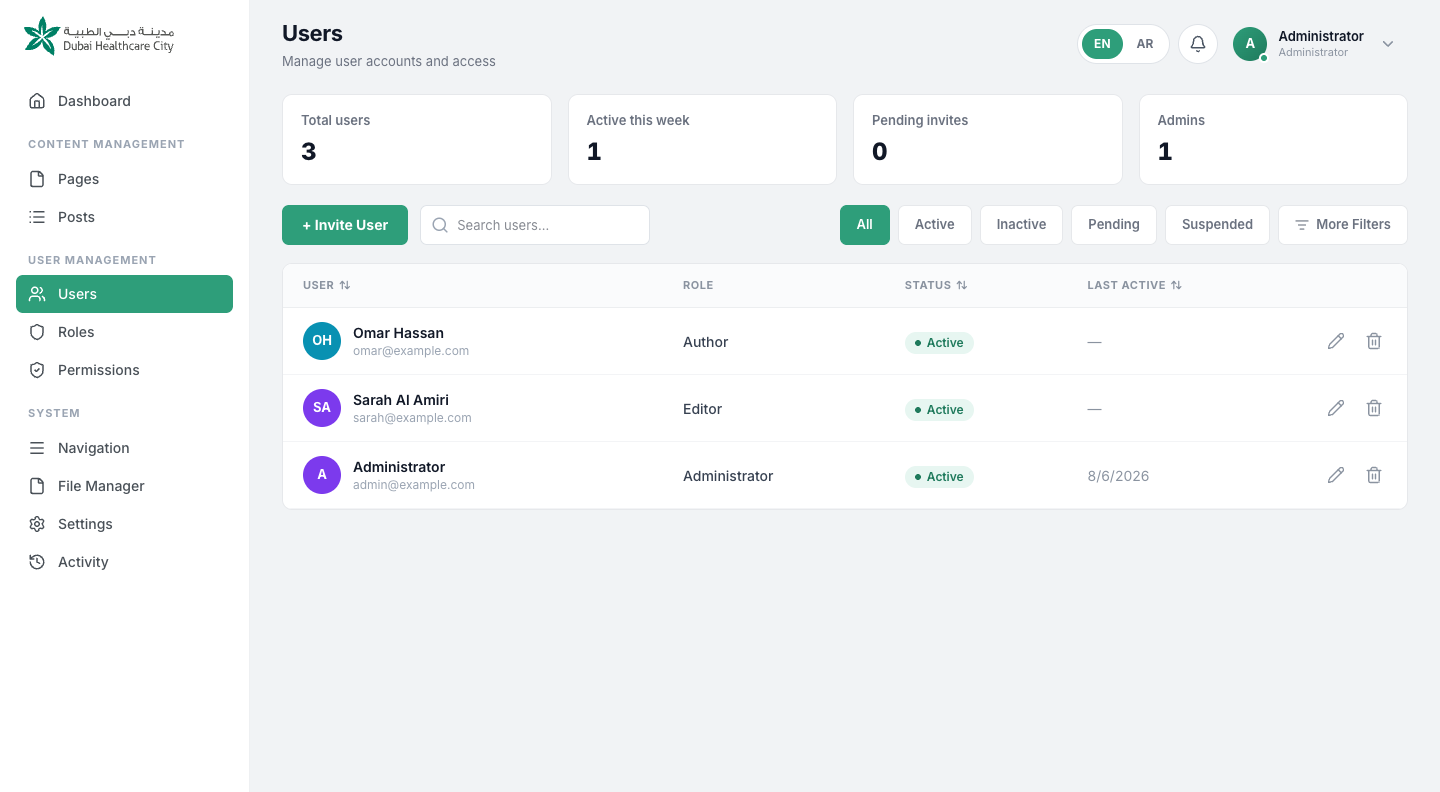
Stat cards across the top summarise your team — total users, how many were active in the last week, how many invites are still pending, and how many hold administrator access. To bring someone new onto the team, click Invite User and provide their name, email, an initial password, a role and a status.
| Status | Meaning |
|---|---|
| Active | Can sign in and use the ACP normally. |
| Inactive | Access is turned off. |
| Pending | Invited, but hasn't signed in yet. |
| Suspended | Access is blocked, typically temporarily. |
Warning: Setting a user to anything other than Active immediately revokes their access everywhere in the CMS — including any AI assistants they've connected through the AI Agent page. This takes effect right away.
Use the search box and filters to find a particular account, and open any row to edit or delete it.
Roles#
Roles group permissions together so you can assign a whole set of capabilities to a user at once, rather than configuring each person individually.
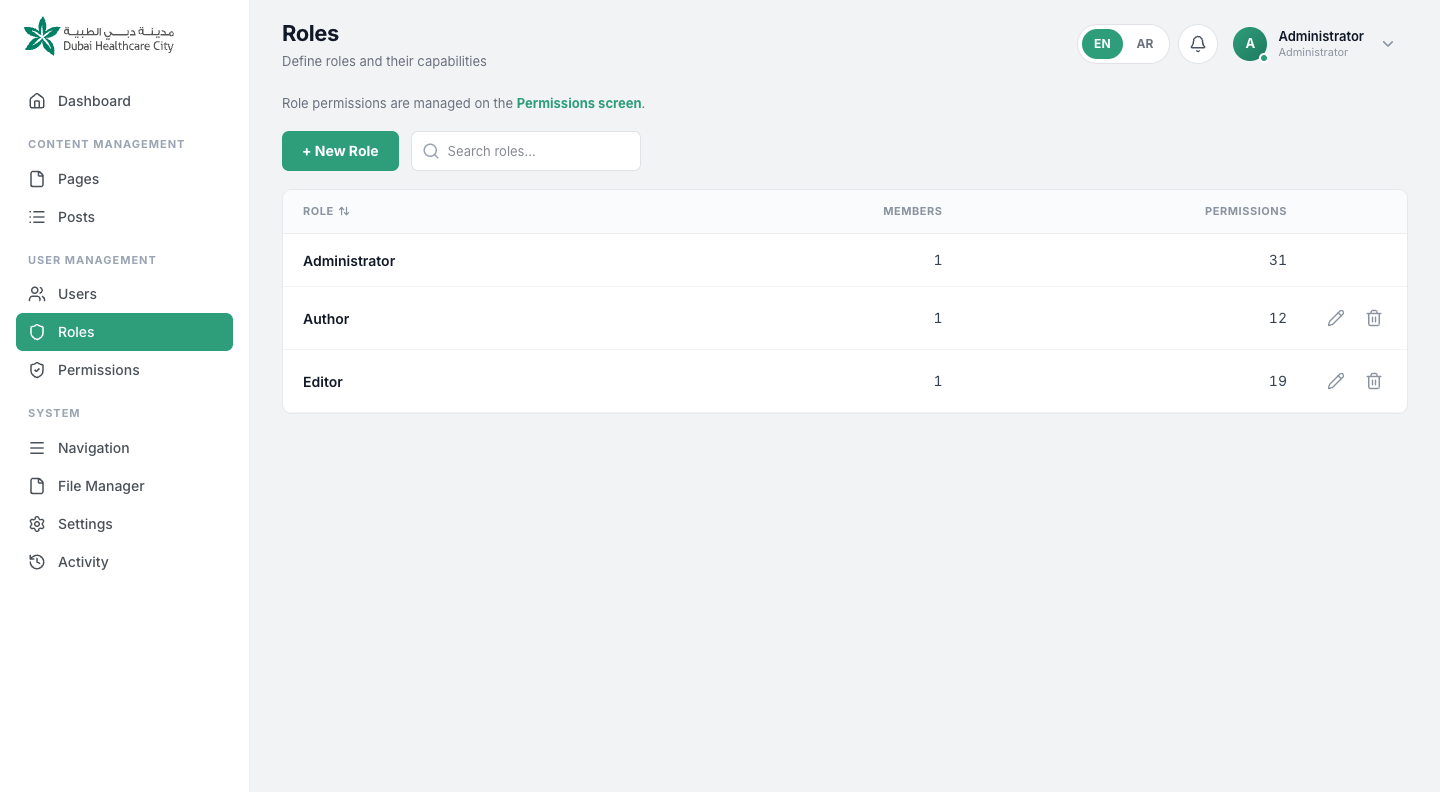
Three roles come built in. Administrator is locked — it always has every permission, and can't be edited or deleted, so there's always at least one role with full control of the system. Editor and Author are sensible starting points for content-focused team members, and you're free to adjust or replace them.
Beyond the three seeded roles, you can create as many custom roles as your team needs with New Role, and rename or delete any custom role later. The Members and Permissions columns on this screen give you an at-a-glance sense of how each role is being used. To actually configure what a role can do, head to the Permissions screen, described next.
Permissions#
Permissions determine exactly what each role is allowed to see and do, module by module.
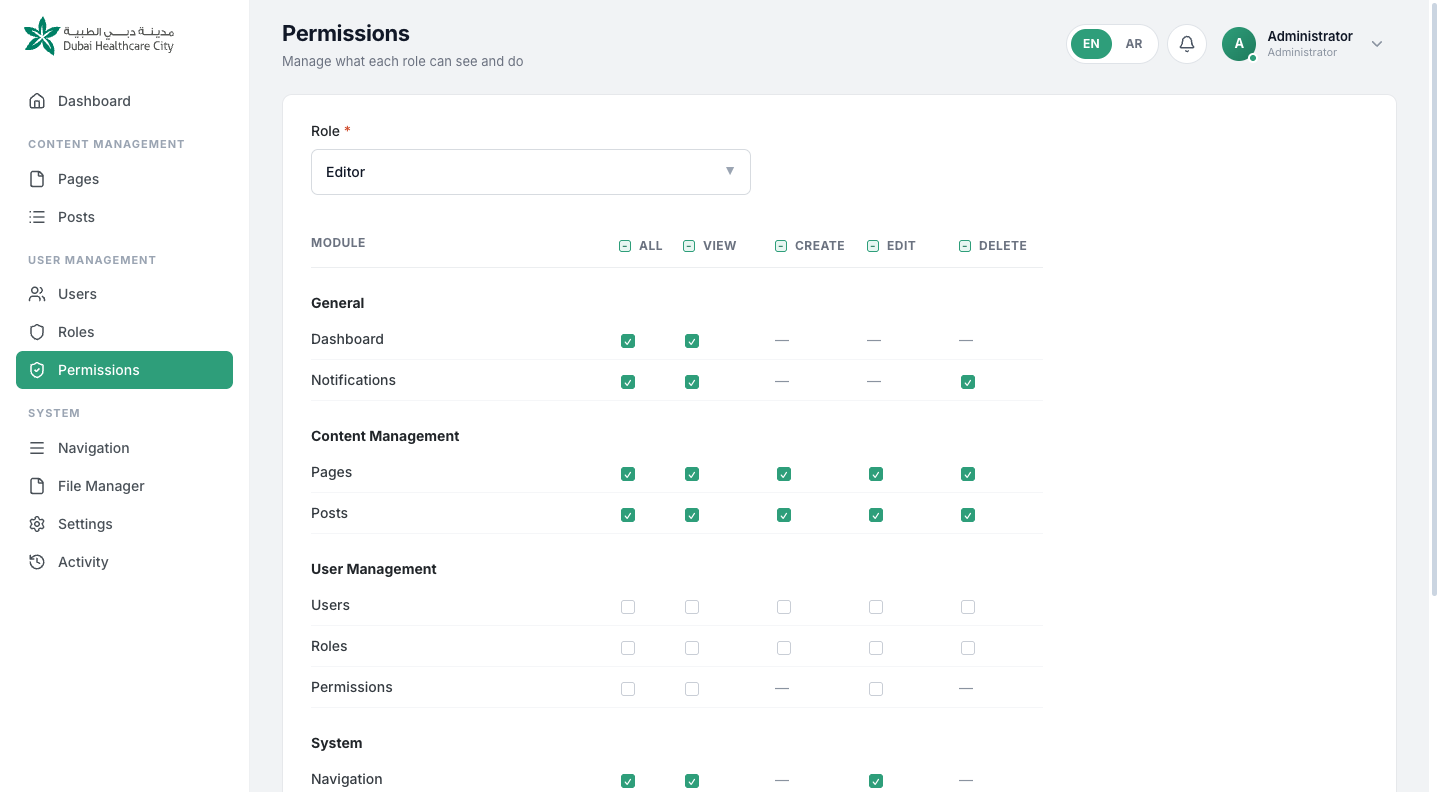
Pick a role at the top of the screen, then toggle capabilities for each module: View, Create, Edit and Delete. Not every module needs all four — Settings, for example, only offers View and Edit, since creating or deleting a setting doesn't make sense. Toggling the switch at the start of a row grants or removes every capability for that module in one click; toggling a column header does the same across every module for that one capability; and the ALL toggle grants or removes everything at once. Click Update Permissions to save.
Permissions aren't just cosmetic. Enforcement happens on the server and is fail-closed — anything not explicitly granted is denied, full stop. The sidebar, the dashboard's stat cards, and buttons throughout the ACP all hide whatever a user isn't permitted to use, so the interface a person sees always matches what they're actually allowed to do.
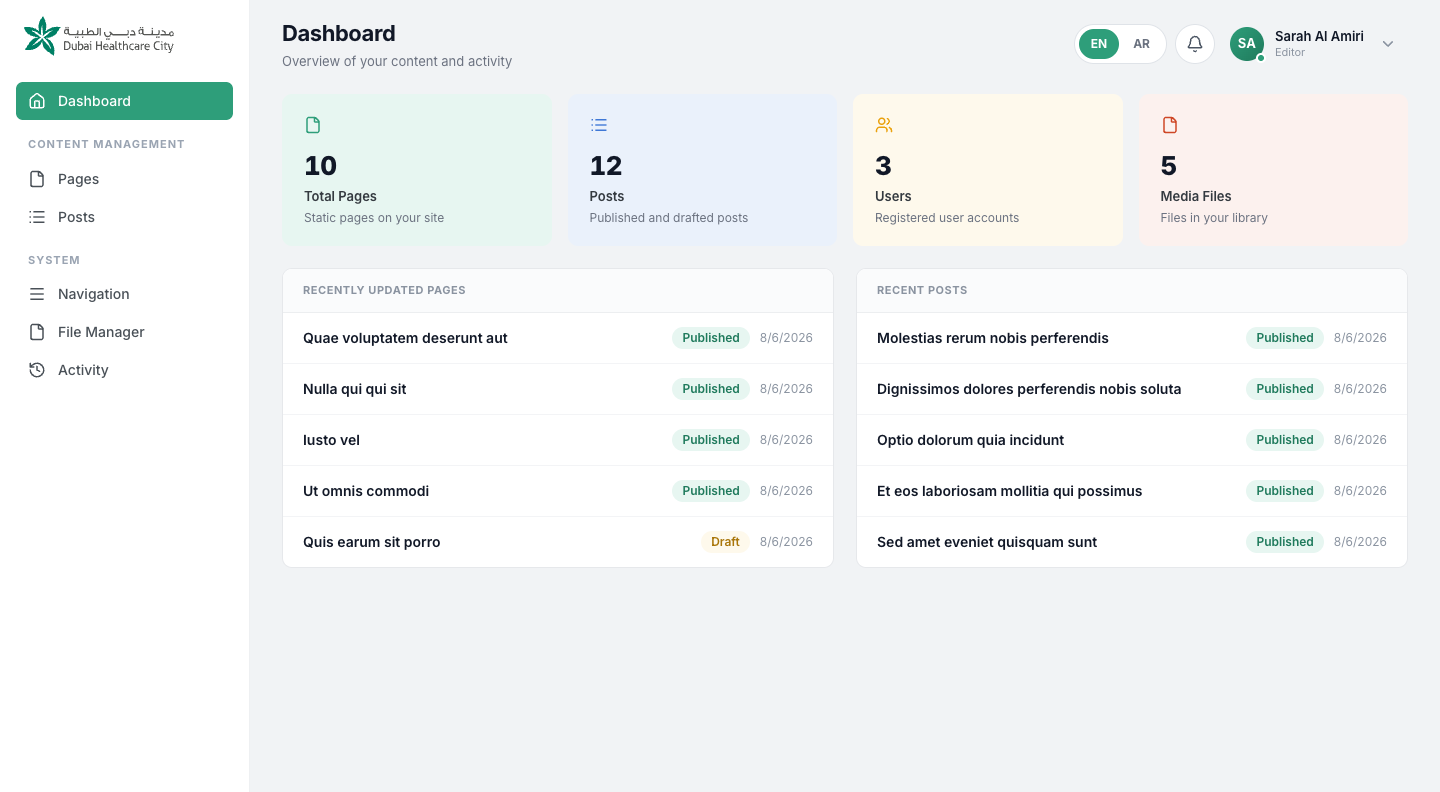
The same limits apply to any AI assistant a user connects — an AI agent can never do more than the person who connected it is permitted to do themselves.
Settings#
Site-wide configuration lives on the Settings screen, organised into groups so related options stay together.
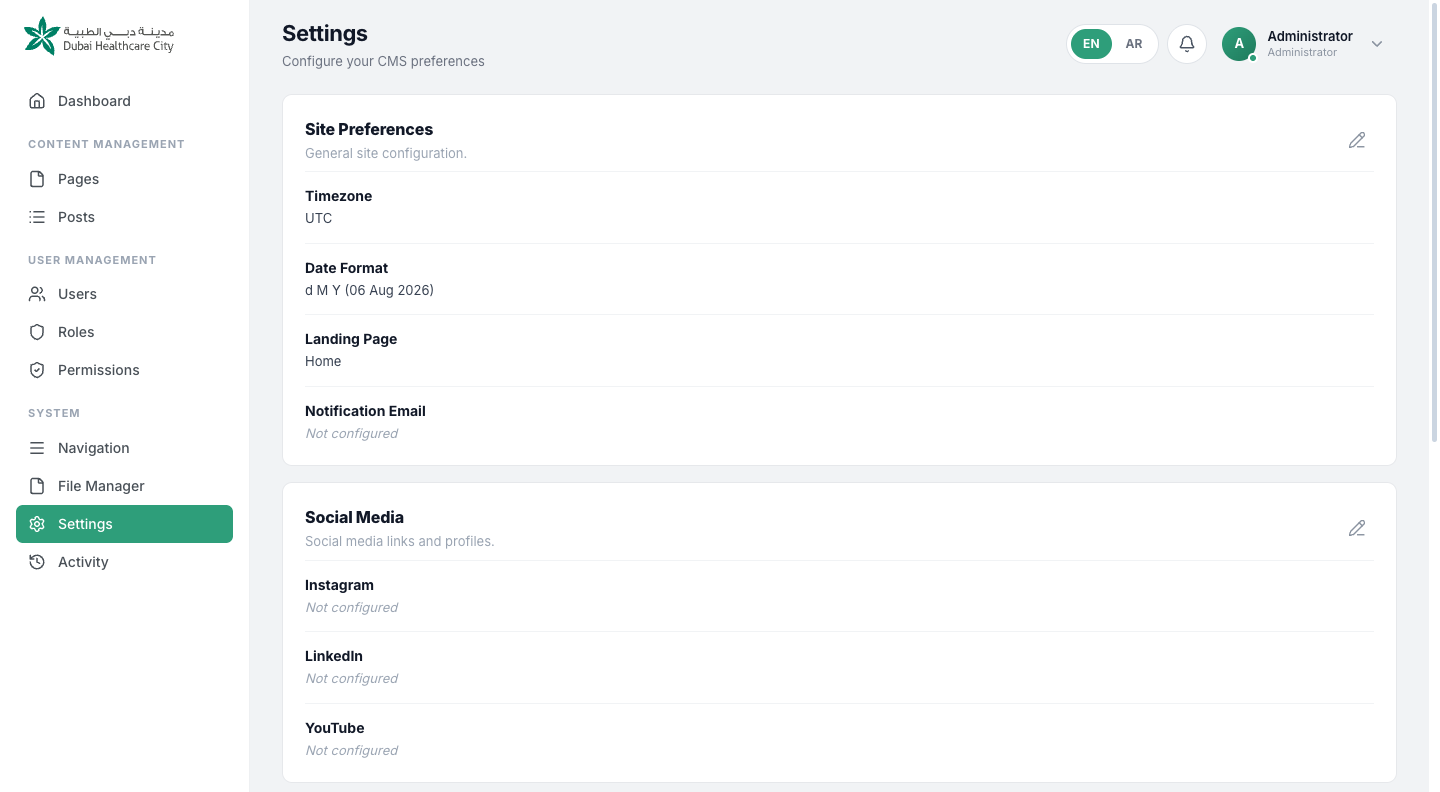
| Group | Contains |
|---|---|
| Site Preferences | Timezone, date format, the Landing Page (which page acts as the site's home page), and the notification email address. |
| Social Media | Instagram, LinkedIn and YouTube URLs, shown in the site footer. |
| Analytics | Google Analytics ID, Google Tag Manager ID and Facebook Pixel ID. Tracking activates automatically as soon as an ID is saved. |
| Scripts | Custom header and footer code snippets, edited in a proper code editor — useful for verification tags and third-party embeds. |
Click Edit on any group to open a slide-over drawer with the right field type for each setting — a date-format picker, a page selector, a code editor, and so on.
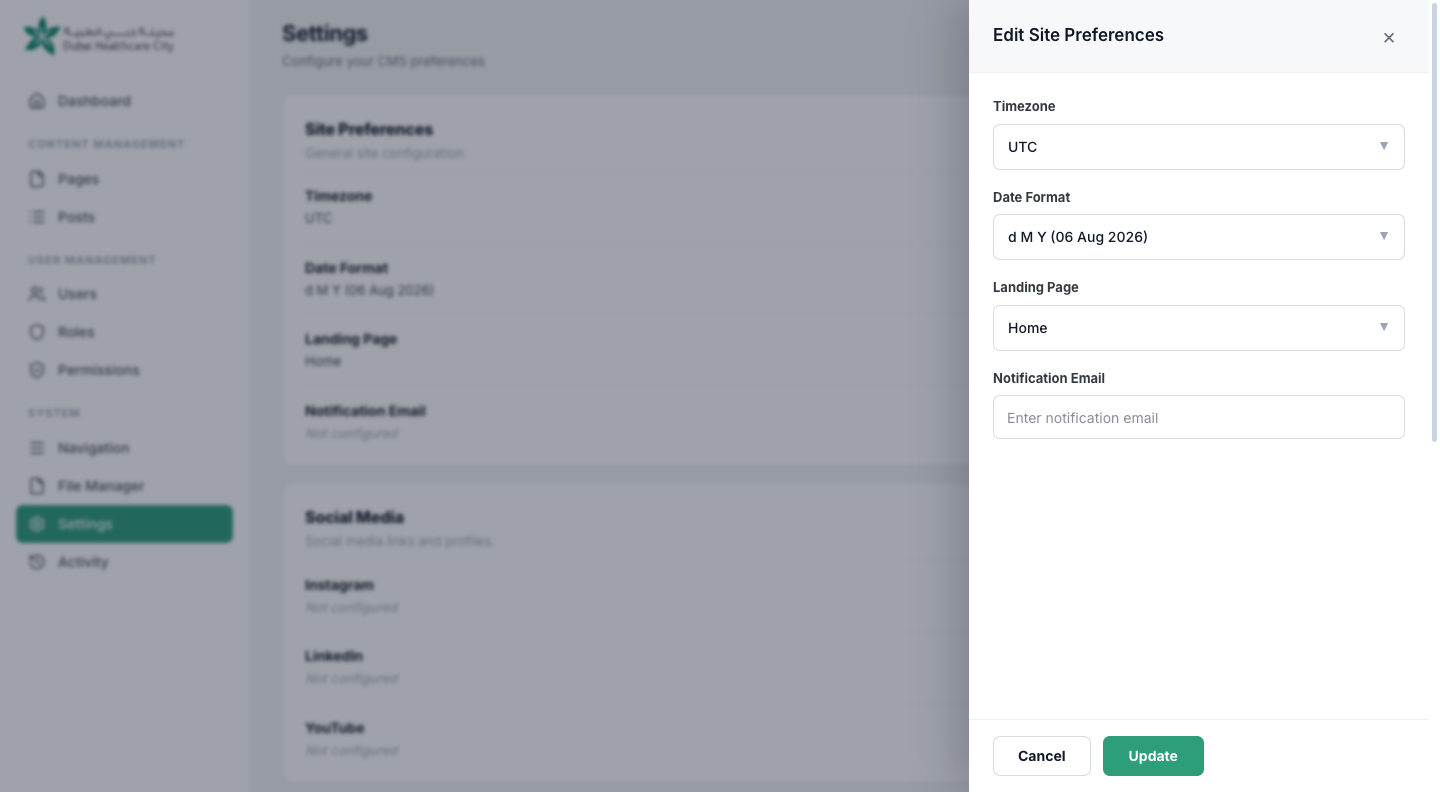
Some settings hold a separate value for each language, so, for example, your notification preferences can stay consistent while other text-based settings vary between English and Arabic.
Activity & Revert#
Every meaningful action in the CMS is recorded — creating, updating and deleting content, translations, permission changes, sign-ins and sign-outs, and password changes. Each entry records who did it, when, from which IP address, and its source: a Human, an AI Agent, or the System itself.
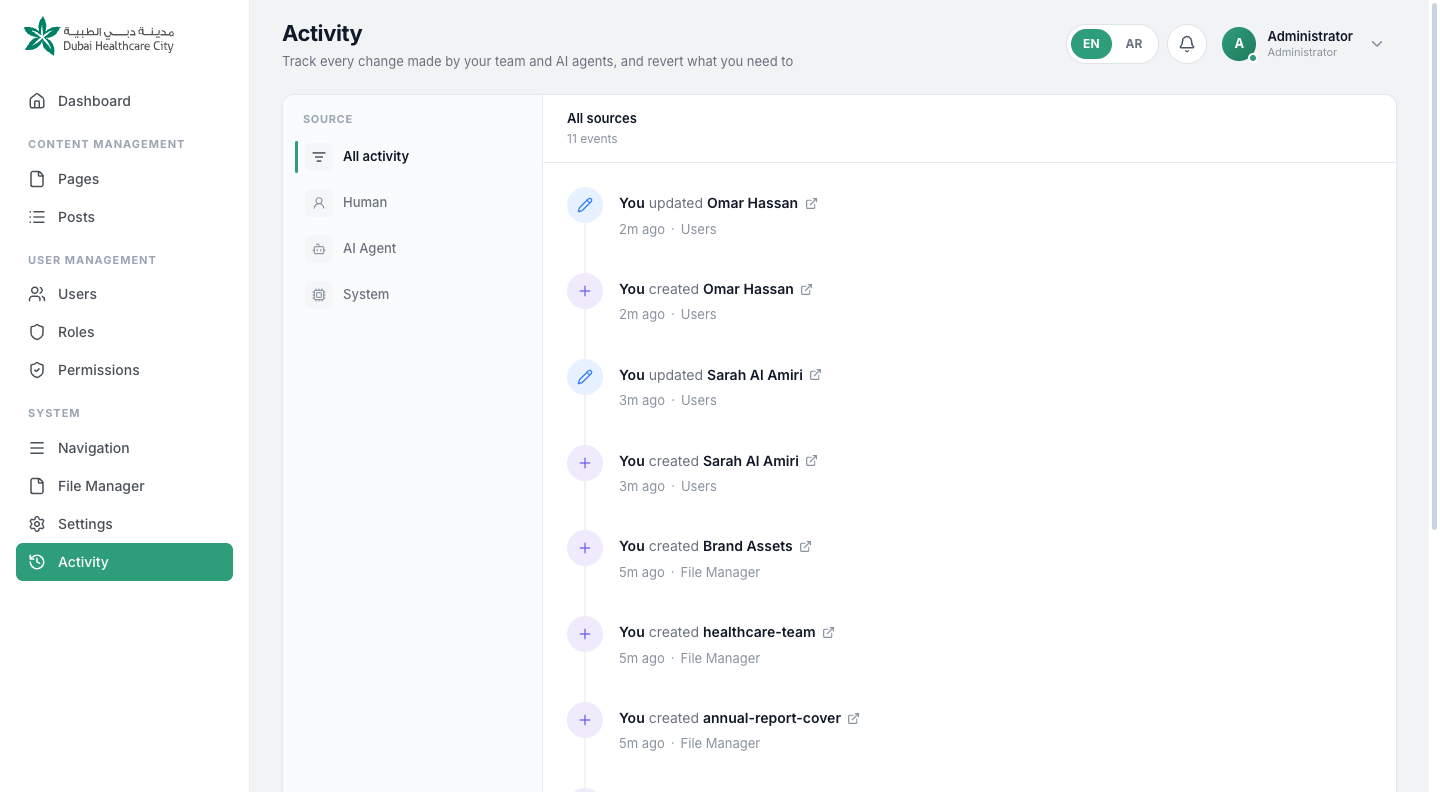
Use the left-hand rail to filter by source, and More Filters to narrow by date, event type or user. Click any entry to open a detail drawer showing a field-by-field before-and-after comparison of exactly what changed.
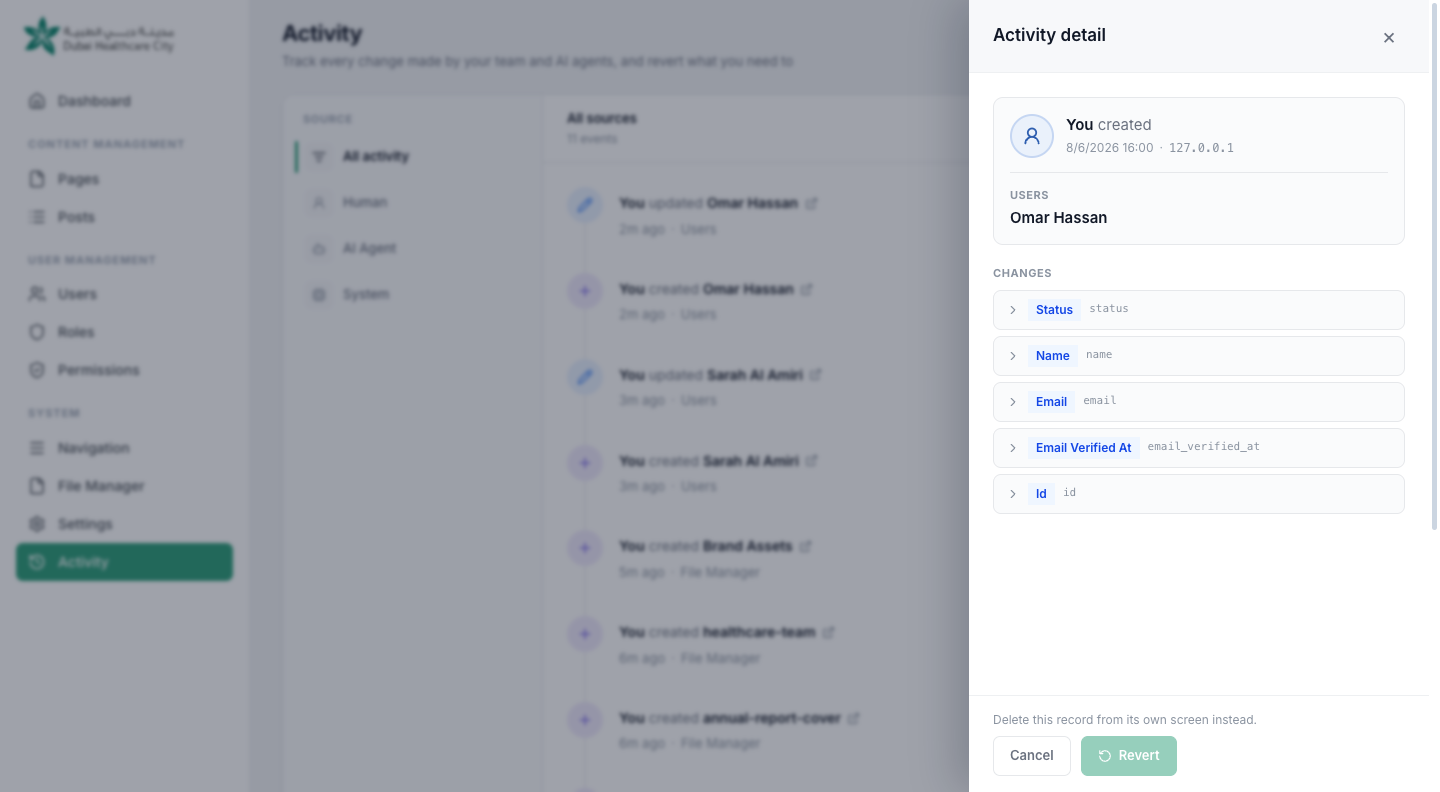
From that same detail view, click Revert to undo the change in one click. Reverting restores previous field values, brings back something that was deleted, or removes something that was created — whichever applies to that entry. The revert itself is recorded as a new activity entry, so the trail stays complete.
Each person on the team also has their own My Activity page, reachable from their account menu, showing just their own history.
Notifications#
A bell icon in the ACP header shows an unread badge whenever there's something new. Clicking it opens a dropdown of recent notifications, with a View all notifications link through to the full inbox.
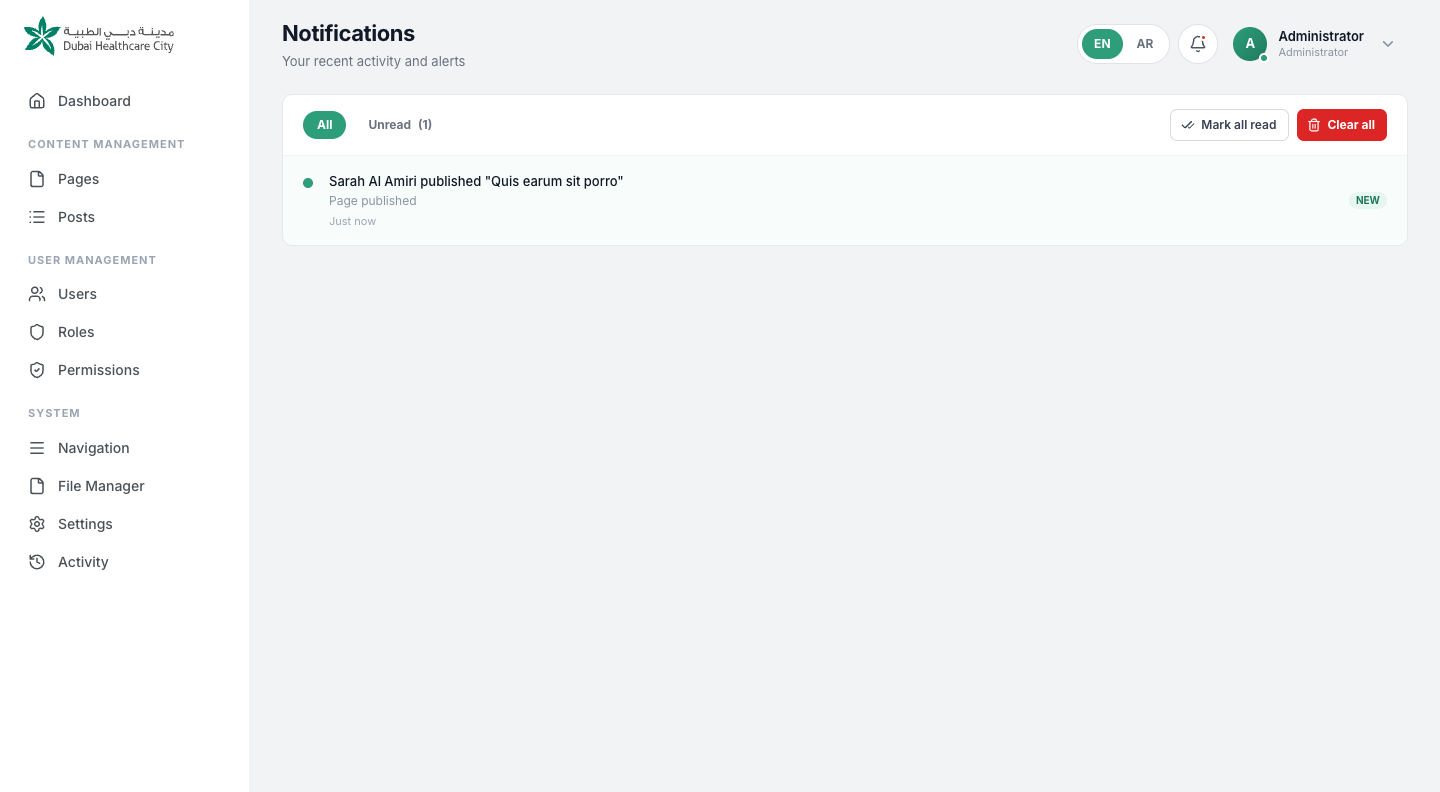
The inbox splits notifications into All and Unread tabs, and you can mark individual items as read, mark everything as read at once, delete a single notification, or clear the whole list. You're notified whenever a piece of content is published, and whenever a new team member is added.
The address notifications are sent to is configurable — it's the notification email field under Site Preferences in Settings.
Your Account#
Click your name in the top-right corner to open the account menu.
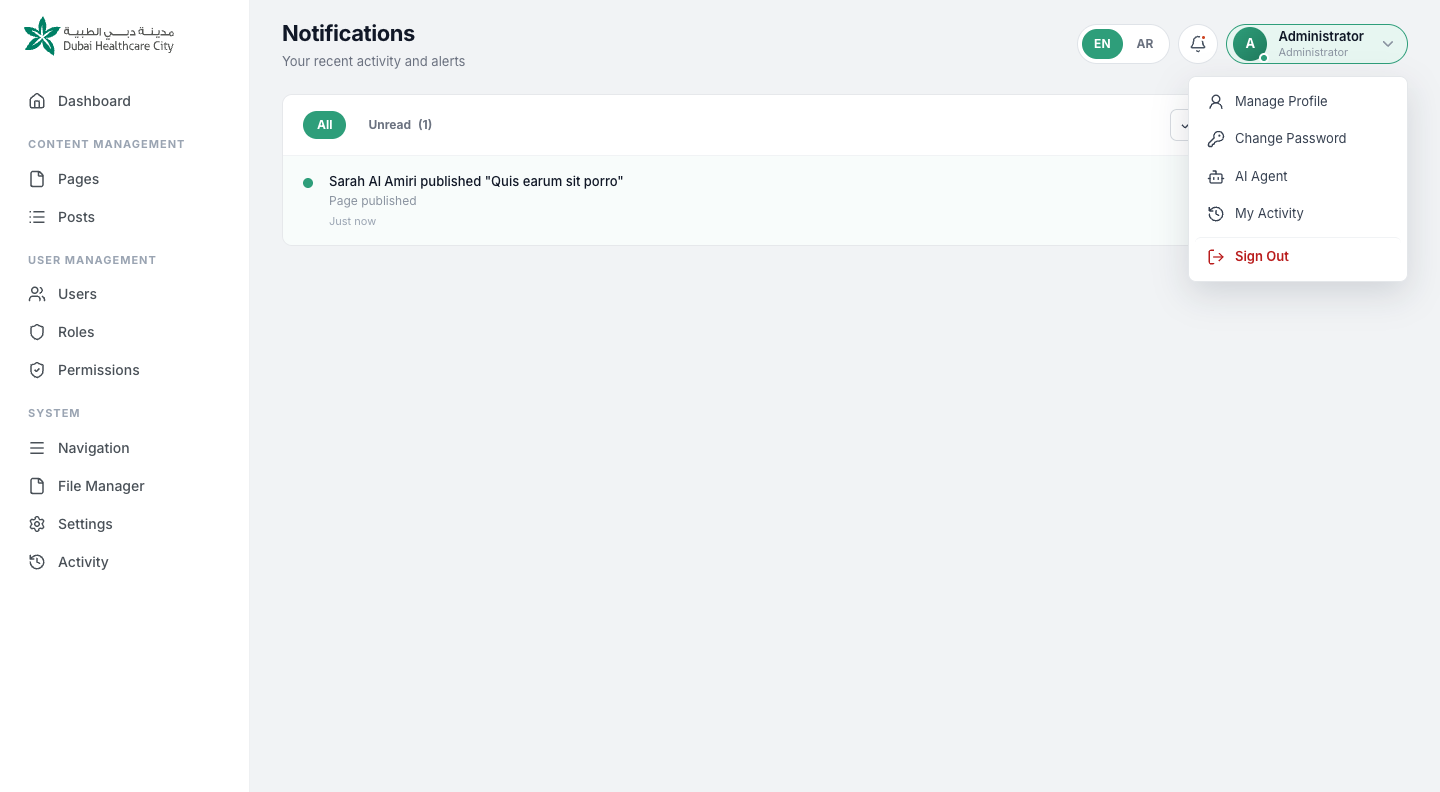
From here you can reach Manage Profile, Change Password, AI Agent (covered next), My Activity, and Sign Out.
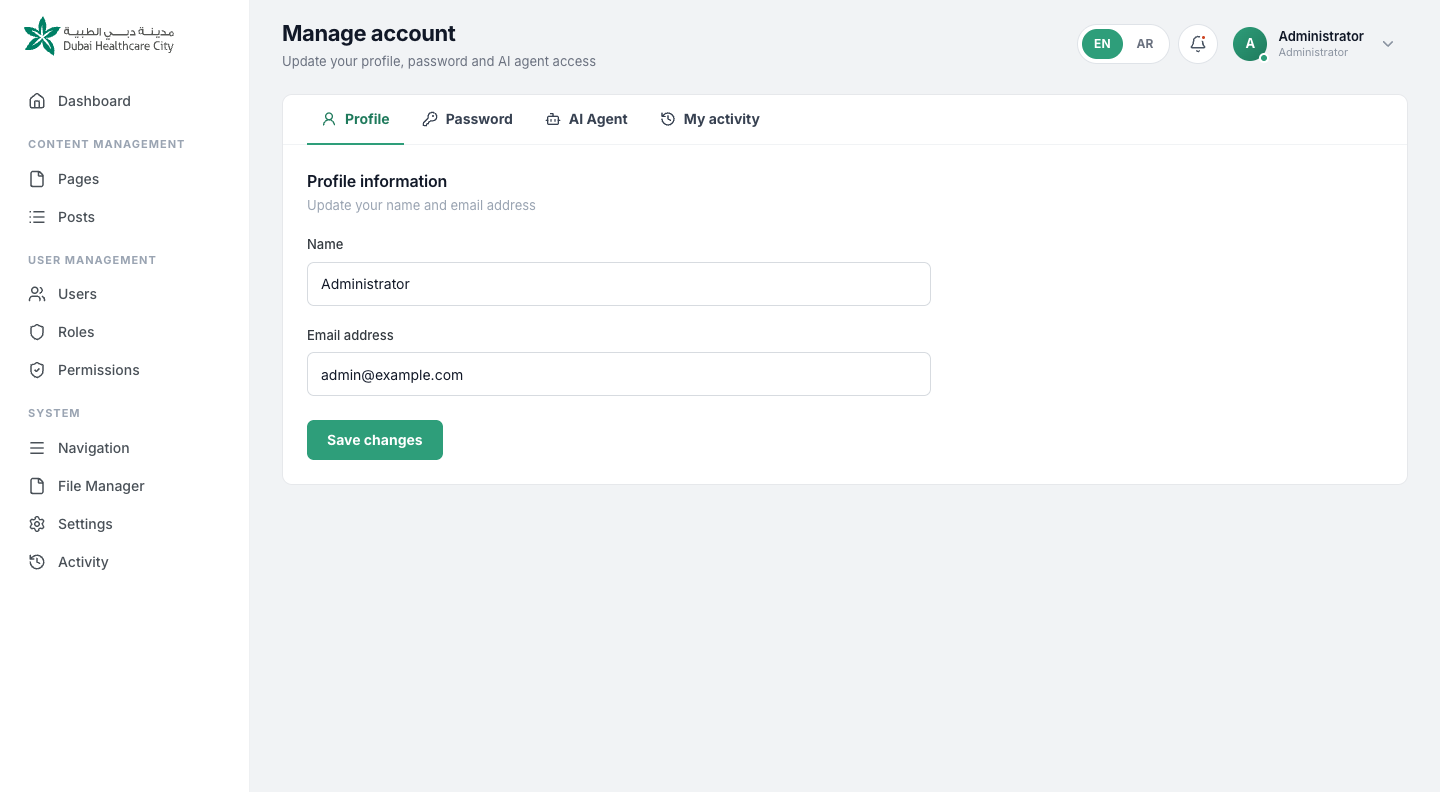
Your profile holds your name and email address. Changing your email asks you to re-verify it before the change takes full effect, and you can resend the verification email from this same screen if you need to. Everything here is self-service — there's no need to raise a ticket just to change your password.
AI Agent Access#
The CMS can be operated directly by AI assistants that support the Model Context Protocol (MCP) — Claude and Cursor among them — through a secure connector tied to your own account.
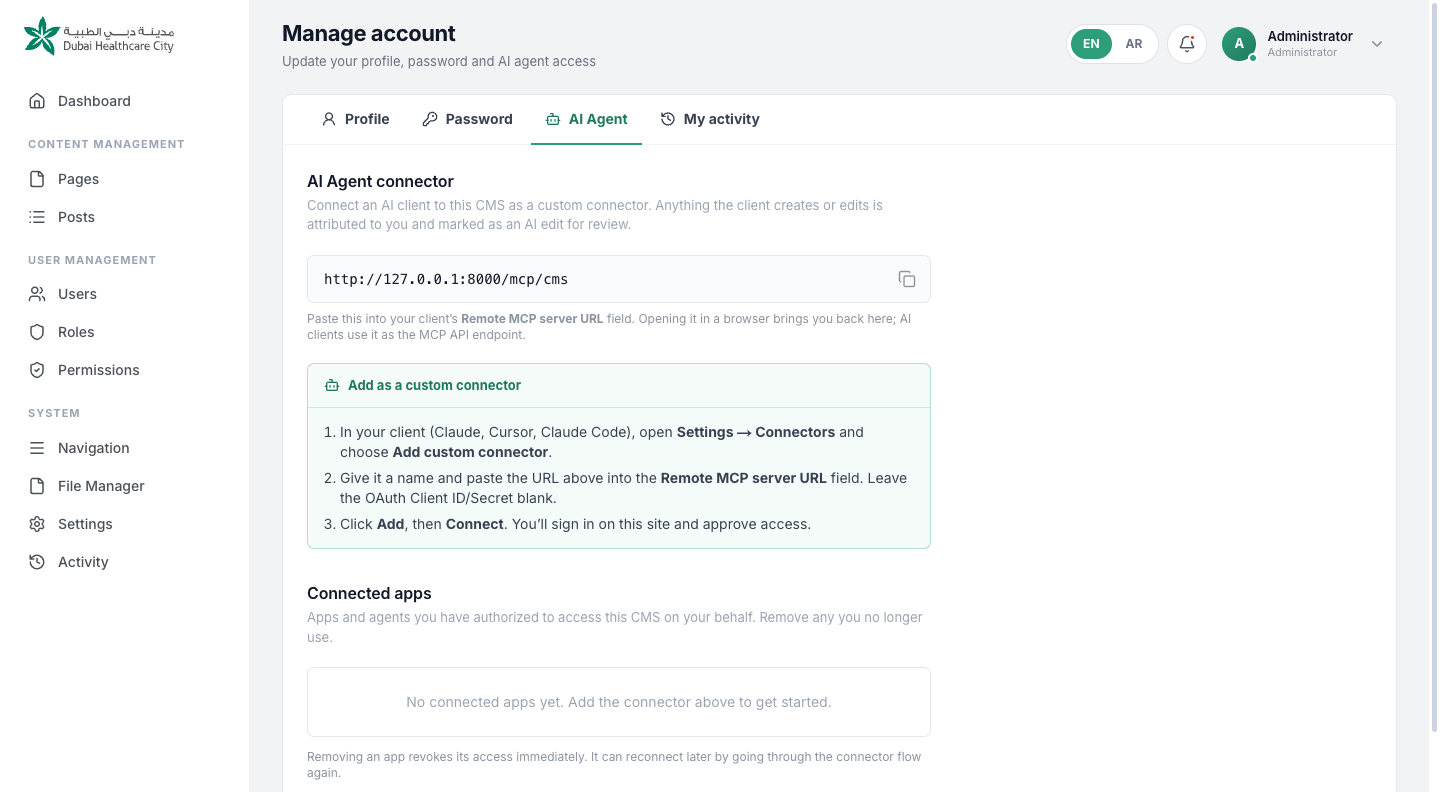
- Open Account → AI Agent.
- Copy the connector URL shown on the page.
- In your AI client, add it as a custom connector, using the Remote MCP server URL field — leave the client ID and secret fields blank.
- Click Connect. You'll be asked to sign in to the CMS and approve access on a consent screen.
Once connected, the assistant can manage pages, posts, categories, media, menus and settings — 23 tools in total, covering the same ground you'd cover by hand in the ACP.
- The agent always acts with your own permissions — never more than you're allowed to do yourself.
- Everything it creates or edits is saved as a draft, and clearly labelled as an AI edit.
- Every action it takes appears in the Activity log under the AI Agent source, along with the connected client's name, and can be reverted just like any other change.
- You can revoke a connected app at any time from this page — revocation is immediate.
Note: Deactivating a user — setting their status to anything other than Active — also cuts off any AI agents they've connected, at the same time as their own ACP access.
The Public Website#
Everything you manage in the ACP flows through to a fast, server-rendered public site, built for both speed and search visibility.
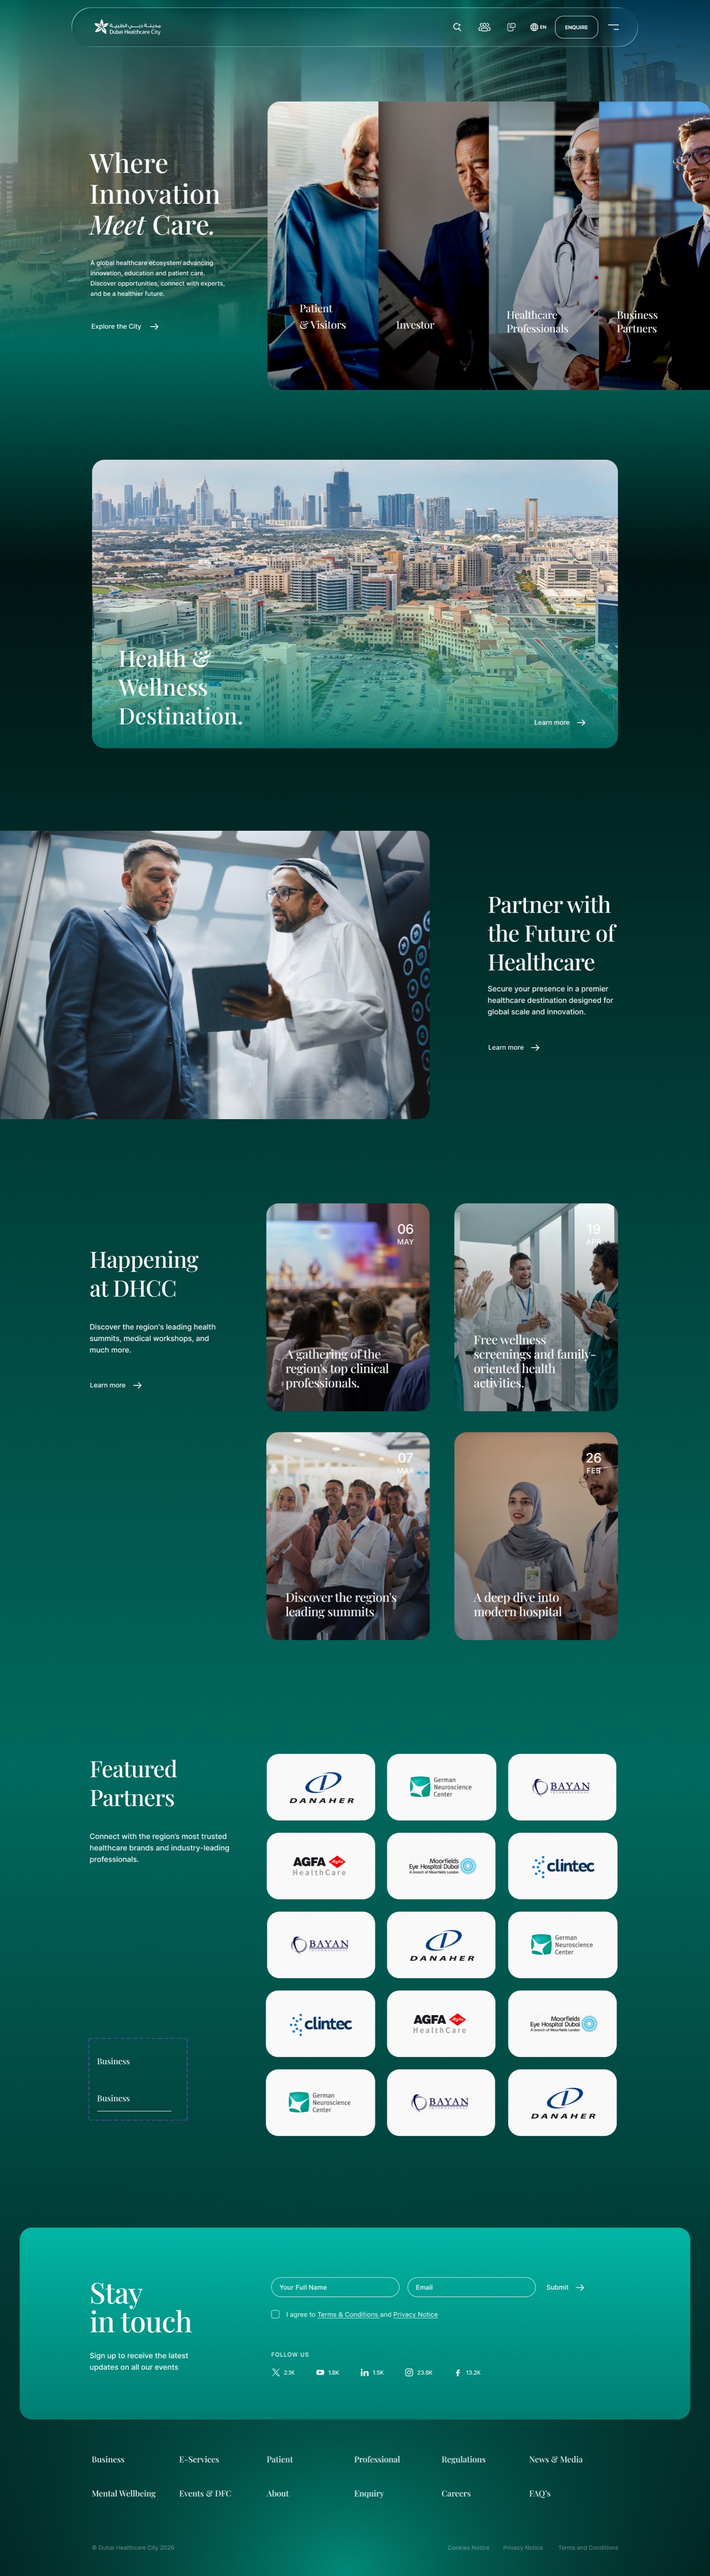
The home page is whichever page you've designated as the Landing Page in Settings. Every other page you create lives at /{slug}, using the slug set when the page was created. The blog lives at /blog, with pagination for older posts, and each article has its own page at /blog/{slug} — article pages also surface three related posts, helping readers find more of what they came for.
The header navigation and footer you see on every page come straight from the Navigation menus you manage in the ACP, and social links and third-party scripts come from Settings — there's nothing to keep in sync by hand.
Because publishing clears the relevant caches automatically, changes you make appear on the live site within seconds. And if something ever goes wrong behind the scenes, the site is designed to degrade gracefully — falling back to cached content, then to a basic site shell, then to a friendly error message — rather than showing visitors a broken page. A designed 404 page handles requests for anything that doesn't exist.
Quick Reference#
Where things live#
| URL | What's there |
|---|---|
/acp | Sign-in and the admin dashboard. |
/acp/pages | The Pages module. |
/acp/posts | The Posts module. |
/acp/media | The File Manager. |
/acp/menus | Navigation menu builder. |
/acp/settings | Site-wide settings. |
/acp/activity | The activity log. |
/blog | The public blog index. |
/{slug} | Any public page, by its slug. |
Content statuses#
| Status | Who sees it |
|---|---|
| Draft | Signed-in editors only. |
| Published | Everyone, on the live site. |
| Scheduled | No one yet — goes live automatically at the chosen time. |
| Archived | No one on the public site; still kept in the CMS. |
Seeded roles#
| Role | Intended use |
|---|---|
| Administrator | Full control of the CMS. Locked and cannot be edited or deleted. |
| Editor | Manages content, files and navigation menus. |
| Author | Writes and edits content. |
Need help?#
If something on the site looks wrong, check the Activity log first — it records who changed what and when, and most changes can be reverted in a single click. Between that and this guide, you should be able to resolve the vast majority of day-to-day issues yourself.